Introduction
What is a WhatsApp marketing platform?
A WhatsApp marketing platform refers to tools, services, or strategies used by businesses to leverage WhatsApp as a channel for marketing and communication. It typically involves sending promotional messages, providing customer support, and engaging with customers using WhatsApp's features such as text, images, videos, and more.
Why you should use WhatsApp marketing platform?
WhatsApp marketing offers direct, personalized communication with a global audience of over 2 billion users, high engagement rates, and multimedia support. It's cost-effective, supports real-time customer support, and provides insights through analytics. Integration with other platforms enhances marketing strategies, making it an effective tool for driving engagement and conversions.
Settings
In the settings, we have four types. Based on these, we will create the settings. The four types are listed below.
- WhatsApp Settings
- Telegarm Settings
- General Settings
- Billing Details
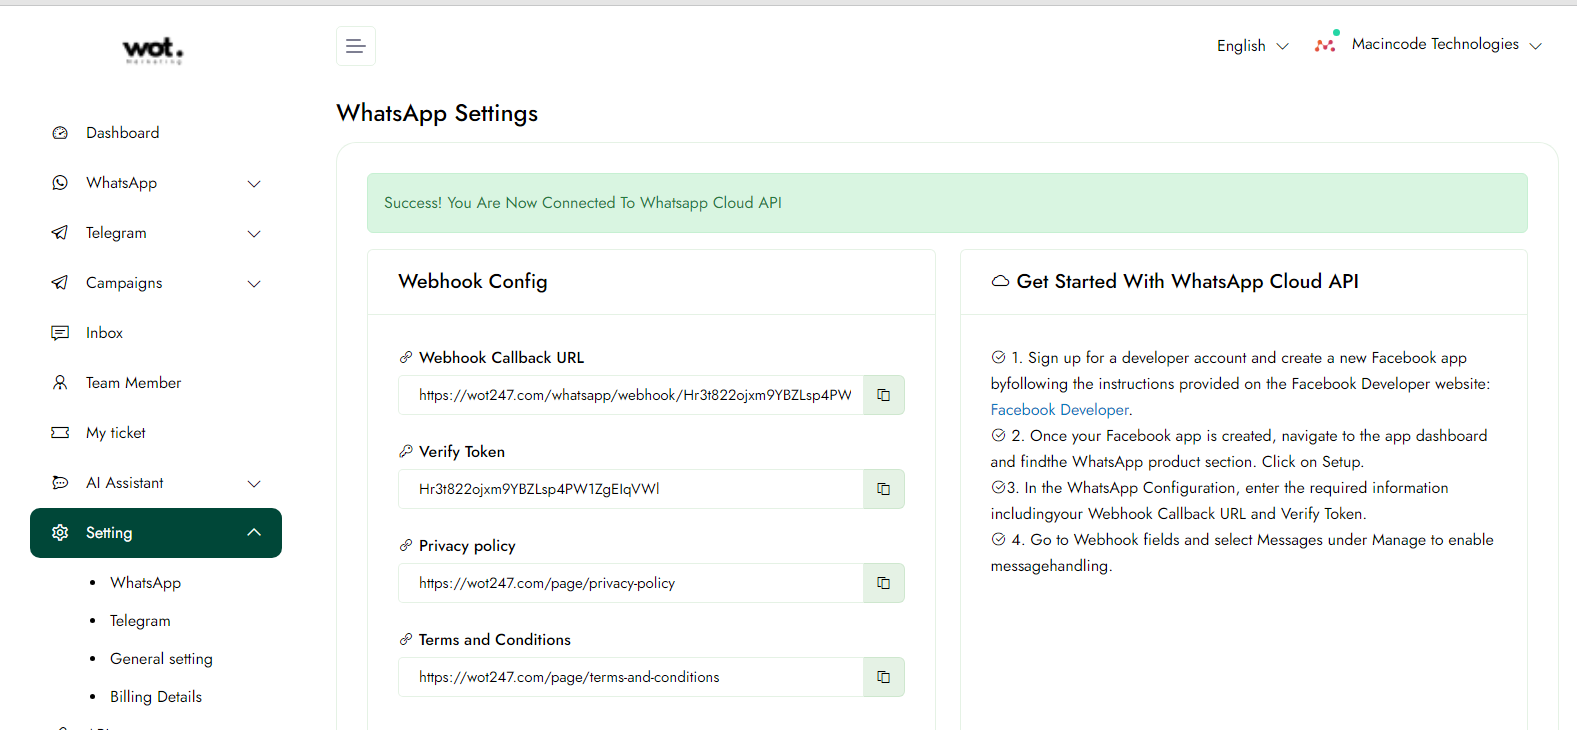
Whatsapp Settings
Upon logging into the WhatsApp marketing platform, you'll start at the whatsapp Settings . Here, you can manage various account preferences, including notifications. The settings you can configure include:
- Webhook Configuration
- WhatsApp Access Token
- Remove WhatsApp Account
Webhook Configuration
Add these webhook settings to your Facebook Developer account: Integrate your WhatsApp account with your Facebook Developer account by adding the required webhook settings. This allows for seamless communication and interaction between your WhatsApp business account and other Meta platforms, enabling better automation and data management.
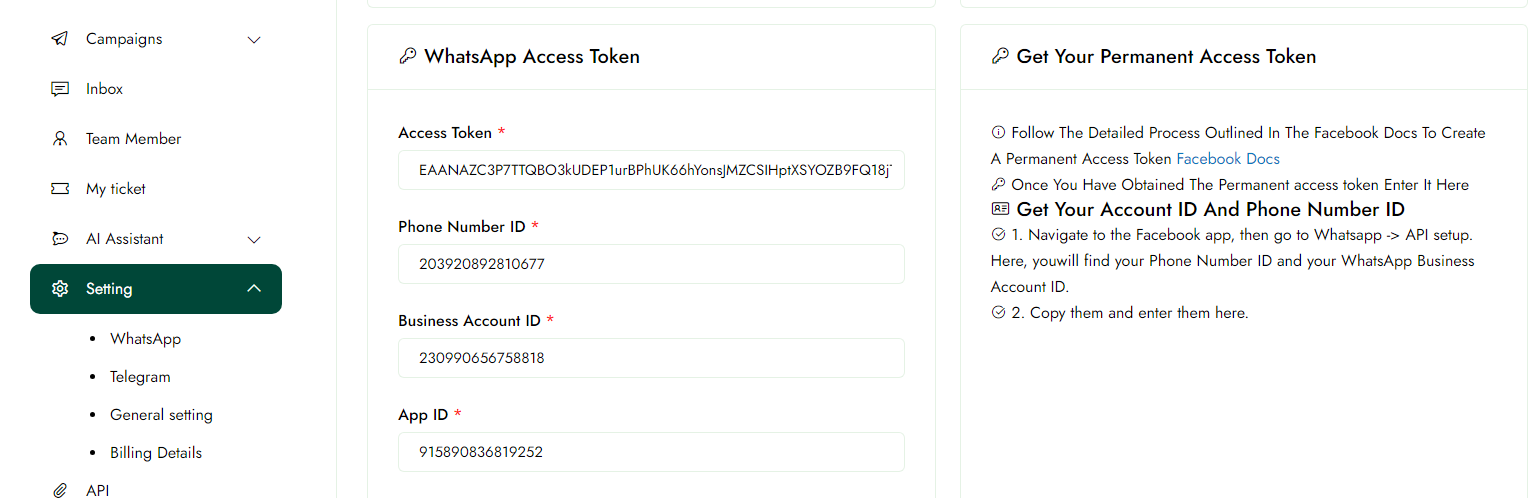
WhatsApp Access Token
Setup the WhatsApp Access Token profile for your ID: Configure your WhatsApp Access Token to include details such as your Access Token, Phone Number ID, Business Account ID, and App ID. This will help your customers recognize and engage with your business effectively.
Remove WhatsApp Account
This will completely delete your WhatsApp integration. Your Business account details will be unaffected: If you choose to remove your WhatsApp account from the platform, the integration will be completely deleted. However, rest assured that your contacts and messages will remain intact and unaffected by this action.

Pre-requisites
Business App or API Setup:Ensure you have the WhatsApp Business App installed or access to the WhatsApp Business API, and your business phone number is verified.
Facebook Developer Account: Create and set up a Facebook Developer account, and ensure your WhatsApp Business Account is linked to your Facebook Business Manager for managing webhooks.
Secure Webhook URL:Prepare a secure, accessible URL for receiving webhook notifications and have a verification token ready for setting up Meta webhooks.
Note: To access features like campaign creation and template creation, a subscription plan is required after registration, which unlocks additional modules.
General Settings
Upon logging into the WhatsApp marketing platform, you'll start at the General Settings dashboard. Here, you can manage account preferences like notifications.
Step-1:
Manually entering the Organization Details on the general settings page, click the "Save" button..
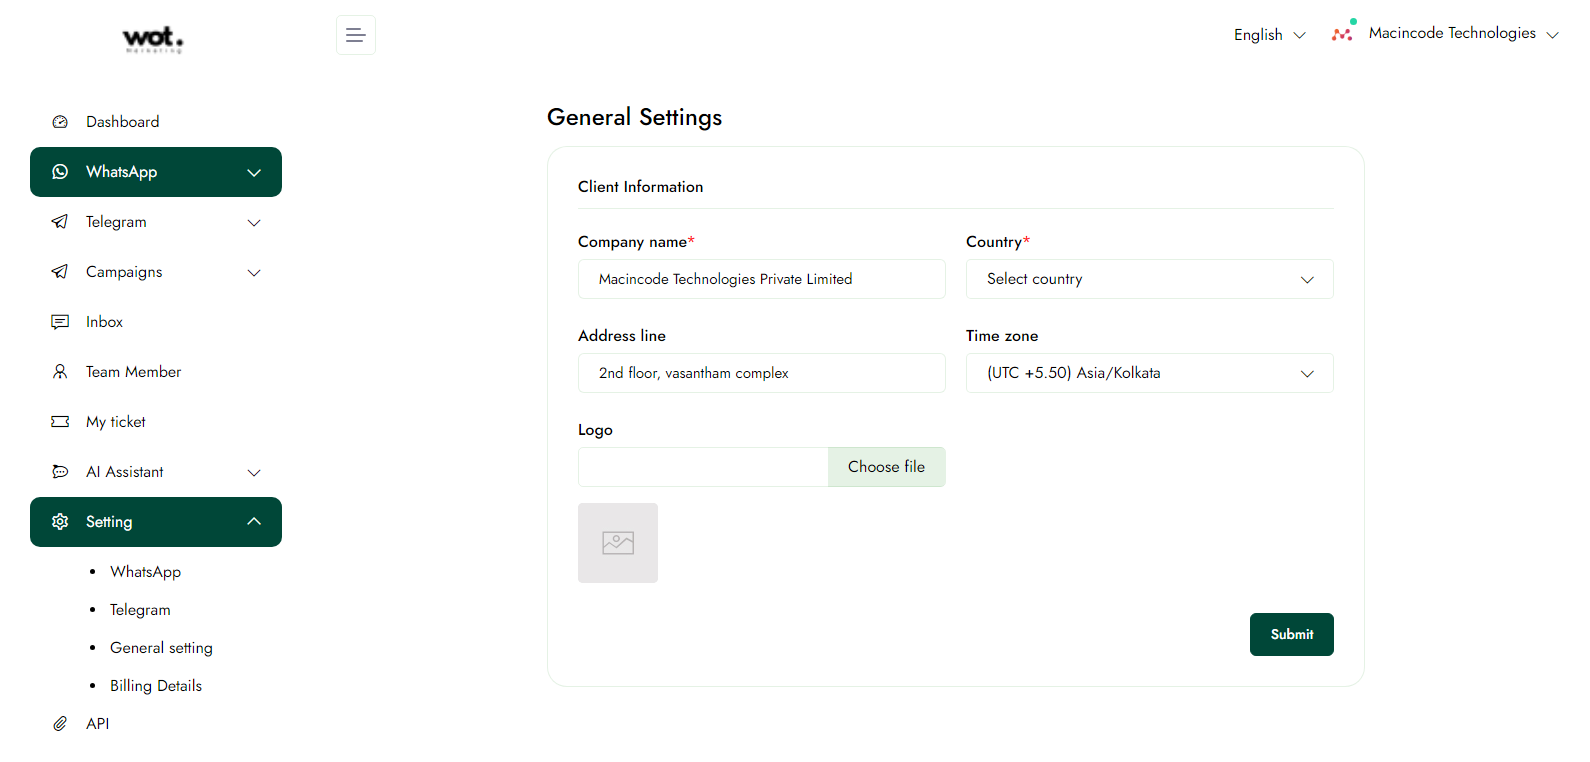
Note: Only a business account is supported.
Note: After registration, you must subscribe to a plan to access modules such as templates, campaigns, and other remaining features. Initially, the subscription plan details will be displayed, and only after completing the subscription will you be able to access the additional modules.
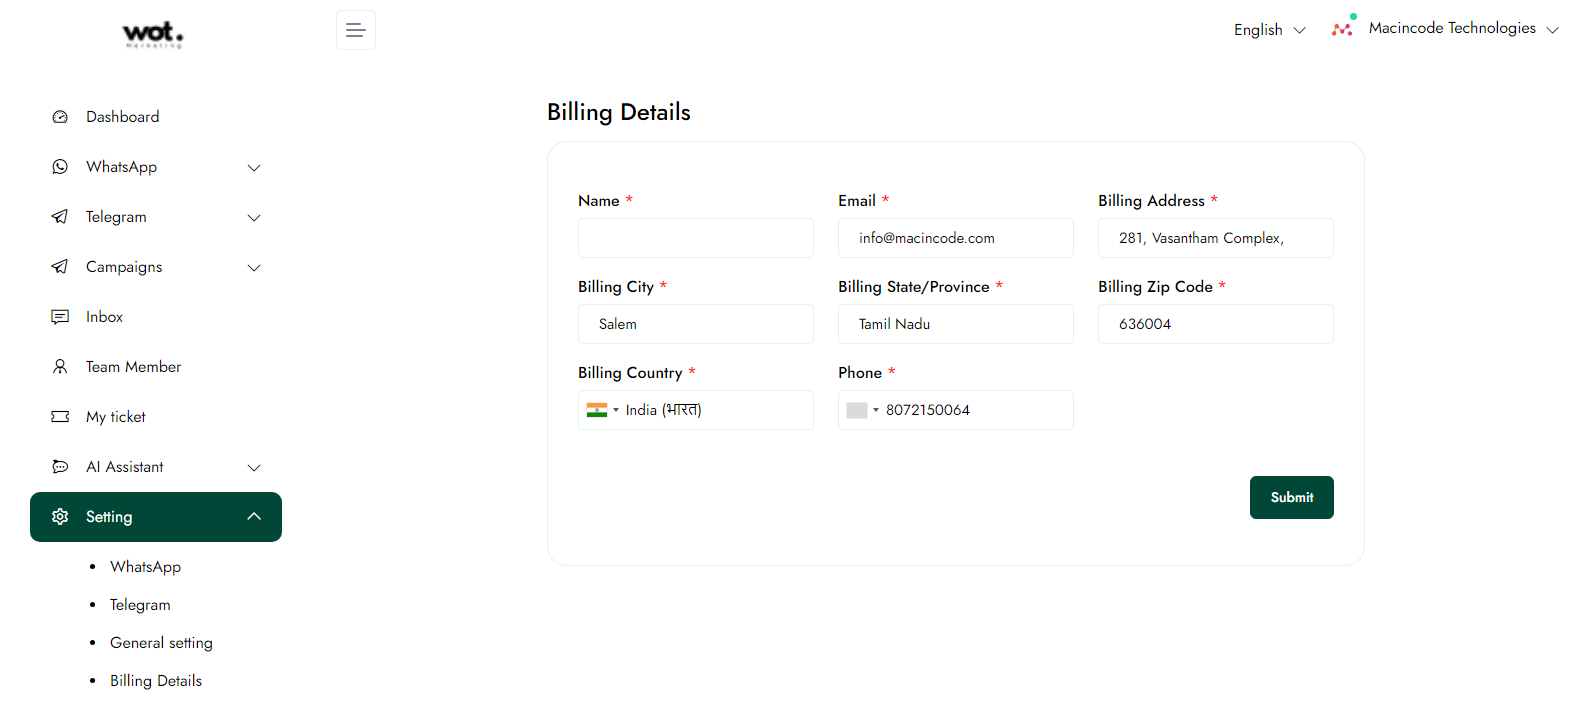
Billing Details
This article outlines the steps to utilize the Billing Details feature on a WhatsApp marketing platform.
My Ticket
This article describes the steps to create a ticket for any issues encountered, after which one of our representatives will contact you on a WhatsApp marketing platform.
Step-1:
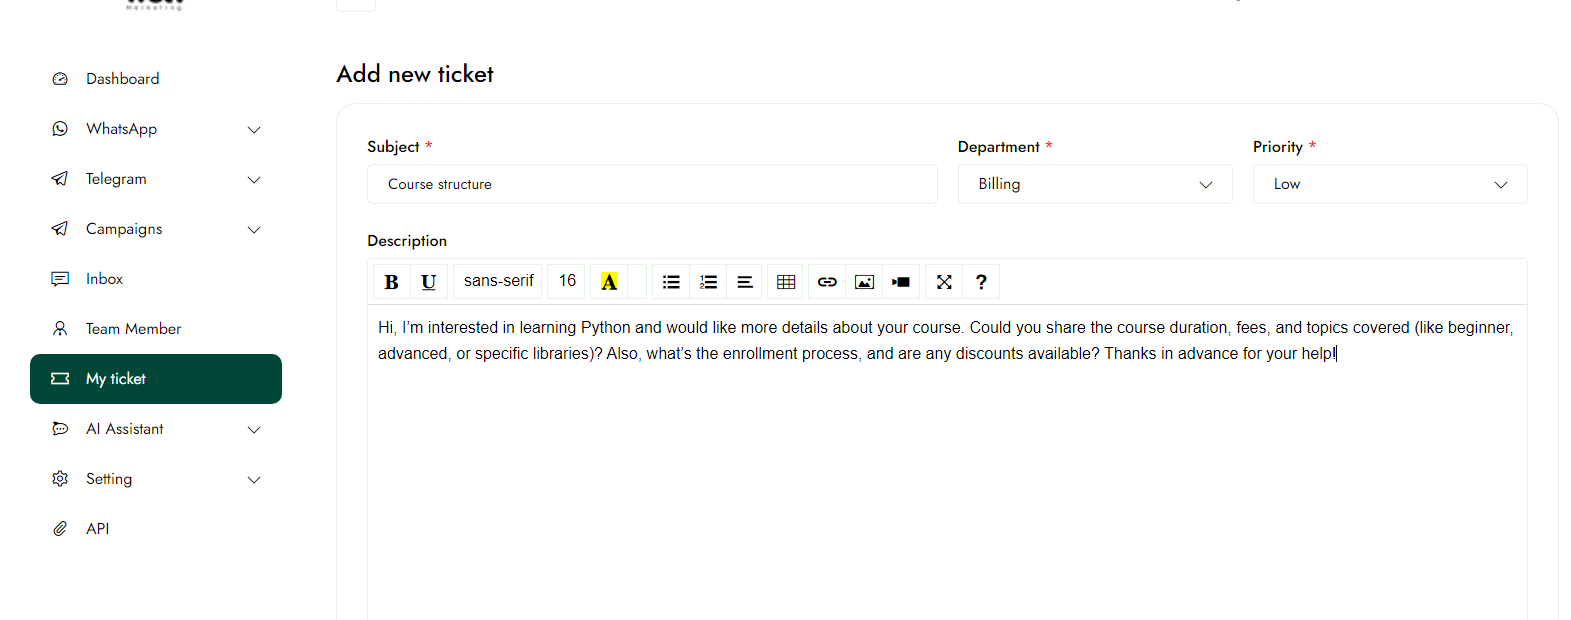
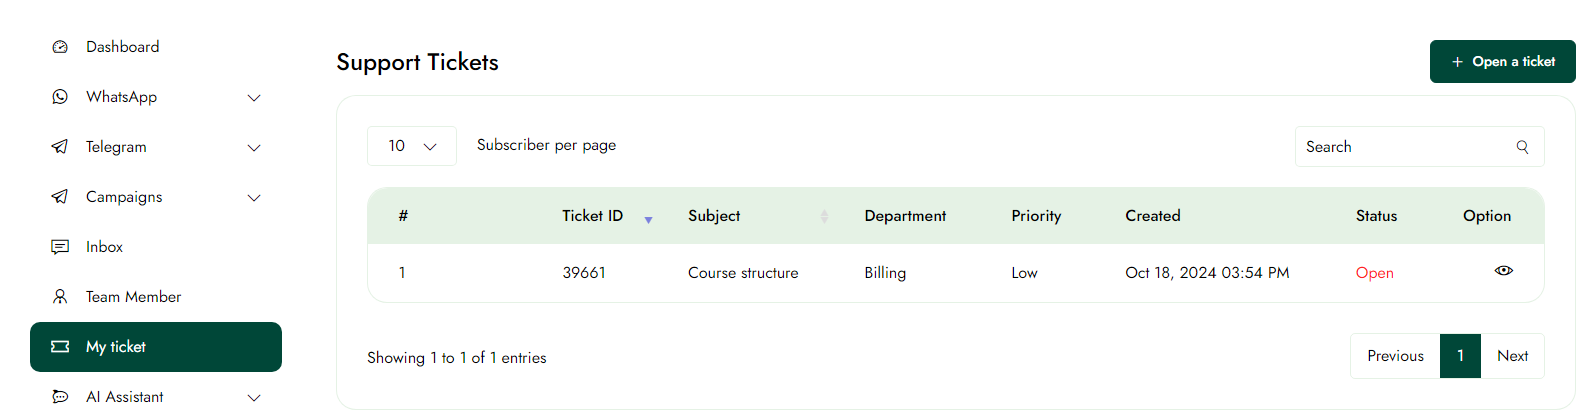
Once logged in, click on My ticket in the left panel.
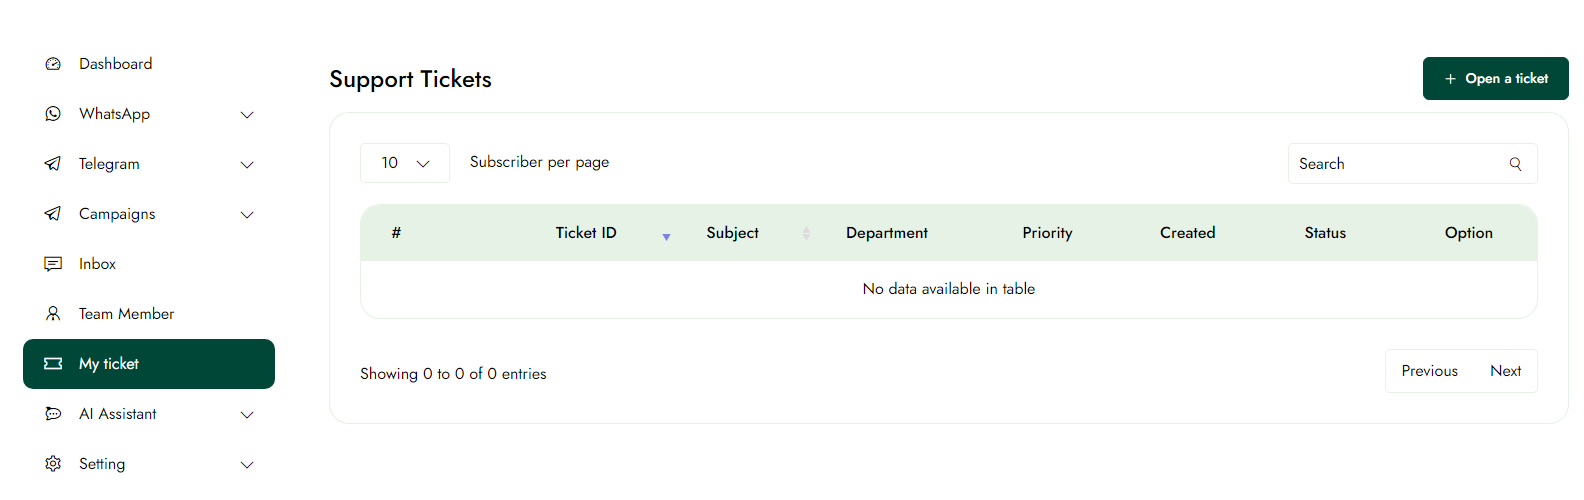
Step-2:
Click the "Open Ticket" button to fill out the form, and then click the "Save" button to save the details.
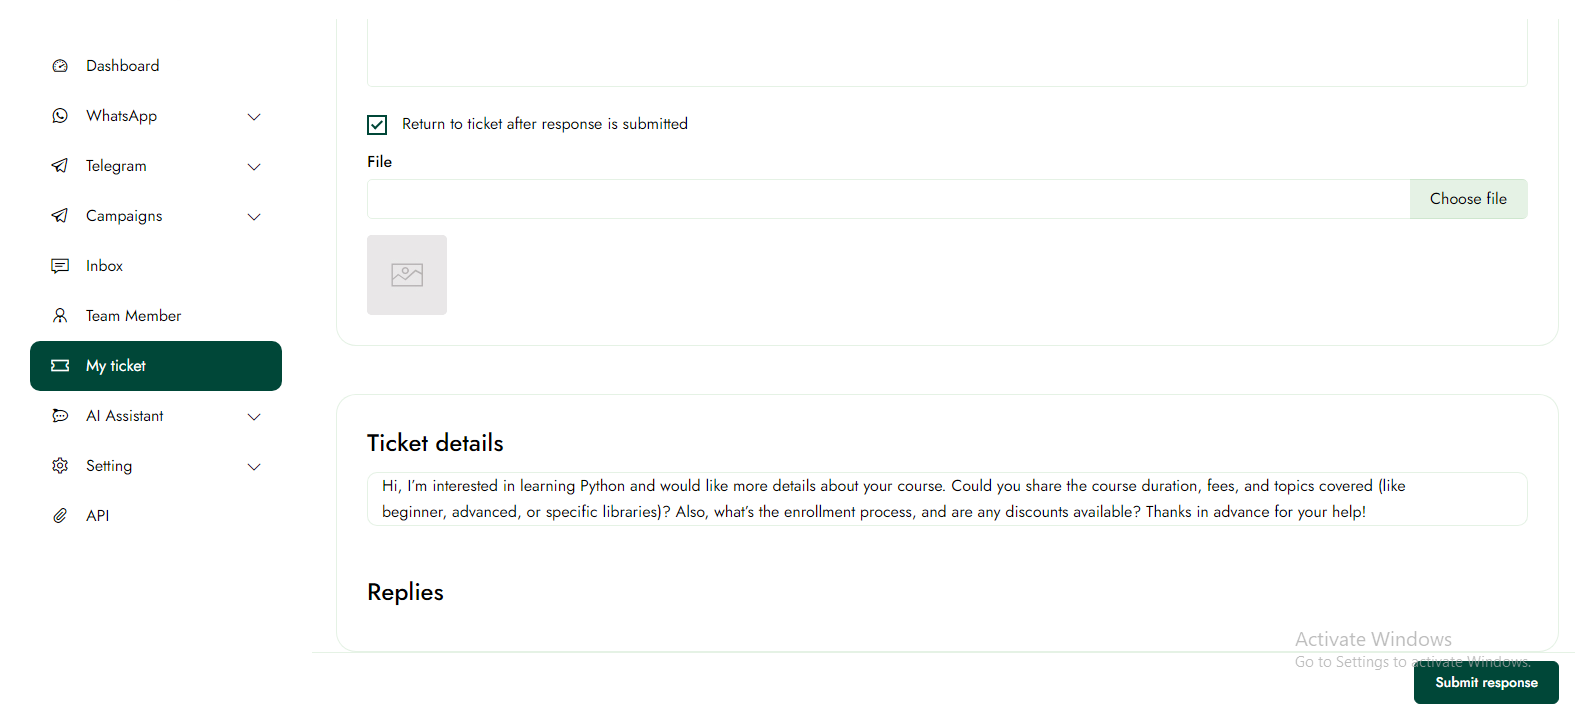
View the issues
Step-1:
Click on the Eye icon on the Ticket page to view the details of the issues.
Contact
Add User Contact
This article outlines the process of creating a Contact within a WhatsApp marketing platform.
Pre-requisites
We can create a new contact, but first, we need to create a contact list and segments so that the new user's contact can be added.
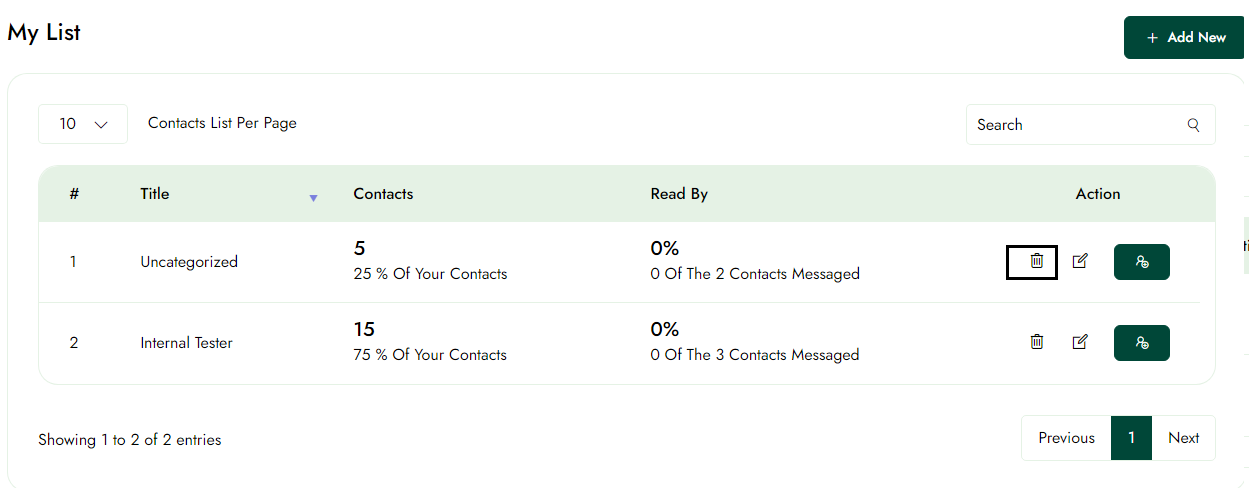
Create Contact list
Step-1:
Once logged in, click on WhatsApp, then select Contact List. After that, click the "Add New" button to create a new contact list that will be reflected in the contacts.


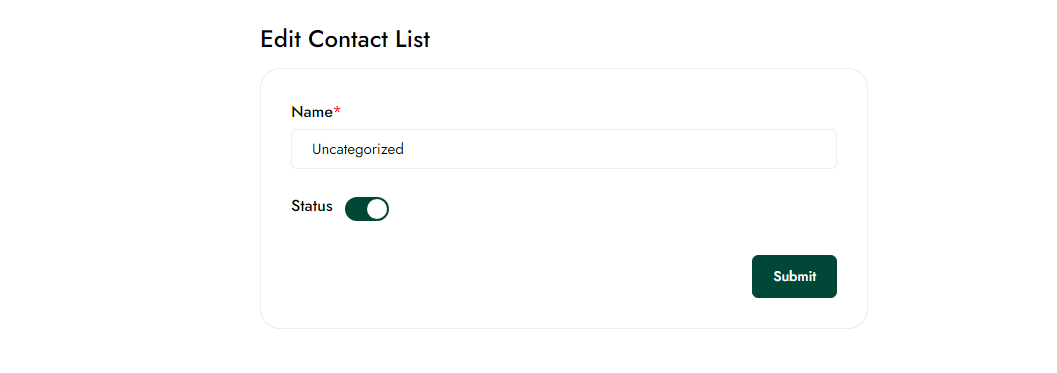
Edit Contact list
Step-1:
Click the edit icon on the contacts list page to update the information; the changes will be saved after clicking the submit button.

Delete Contact list
Click the Delete icon on the contacts list page to remove the information; it will be deleted successfully.
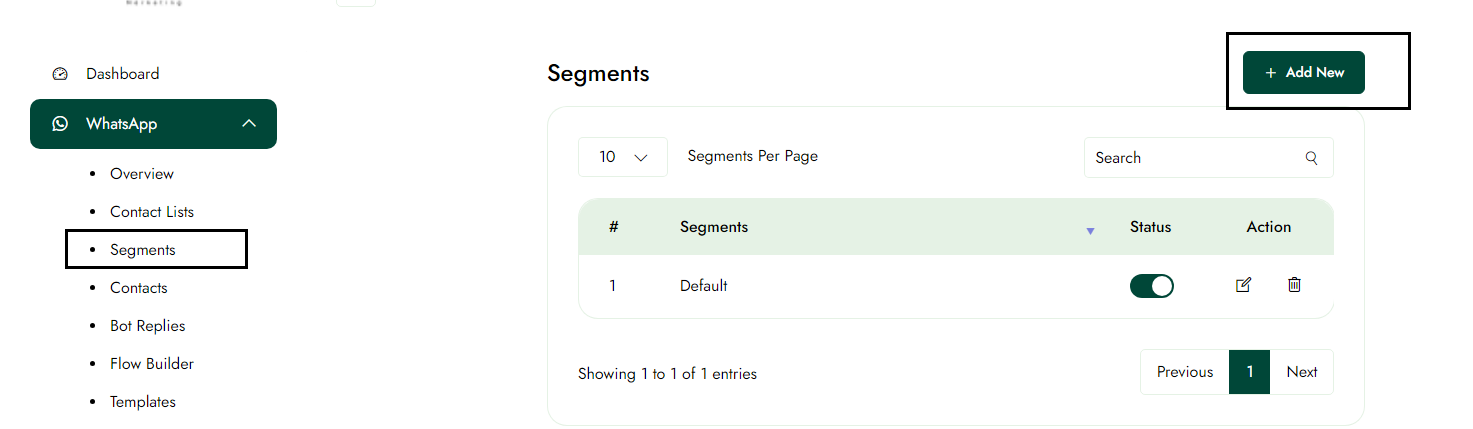
Add segments
Step-1:
Once logged in, click on WhatsApp, then select segments. After that, click the "Add New" button to create a new segments that will be reflected in the contacts.
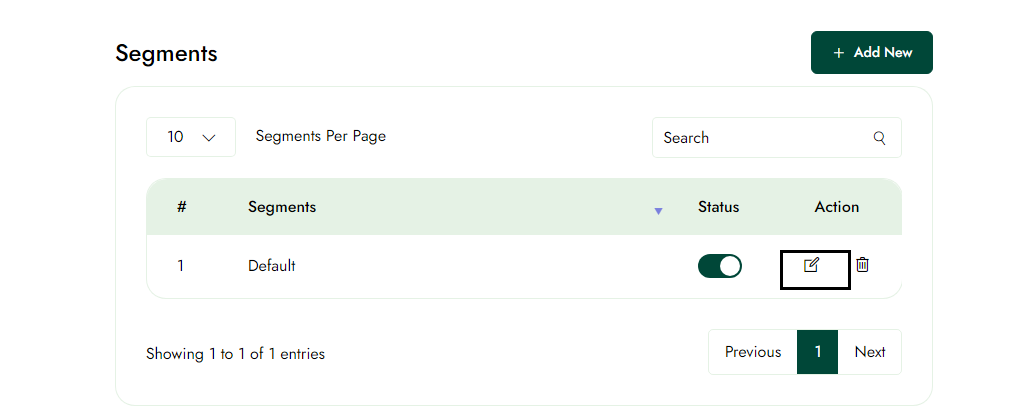
Edit Segments
Step-1:
Click the edit icon on the segments page to update the information; the changes will be saved after clicking the submit button.

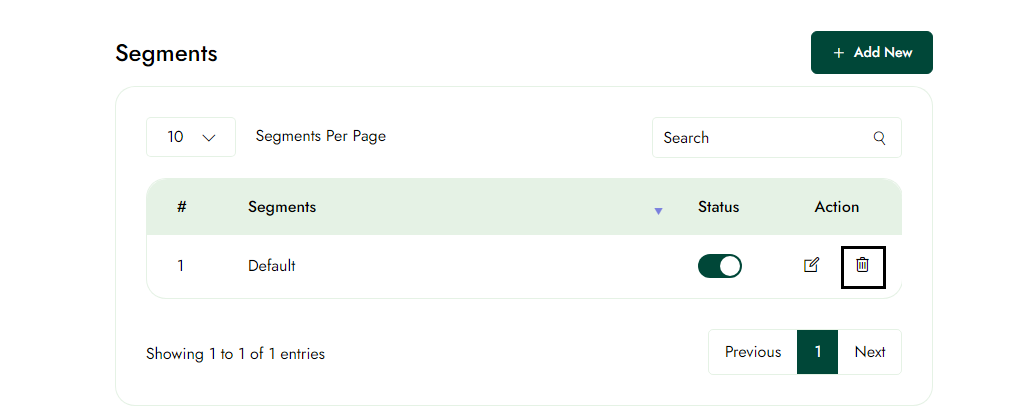
Delete Segments
Click the Delete icon on the Segments page to remove the information; it will be deleted successfully.
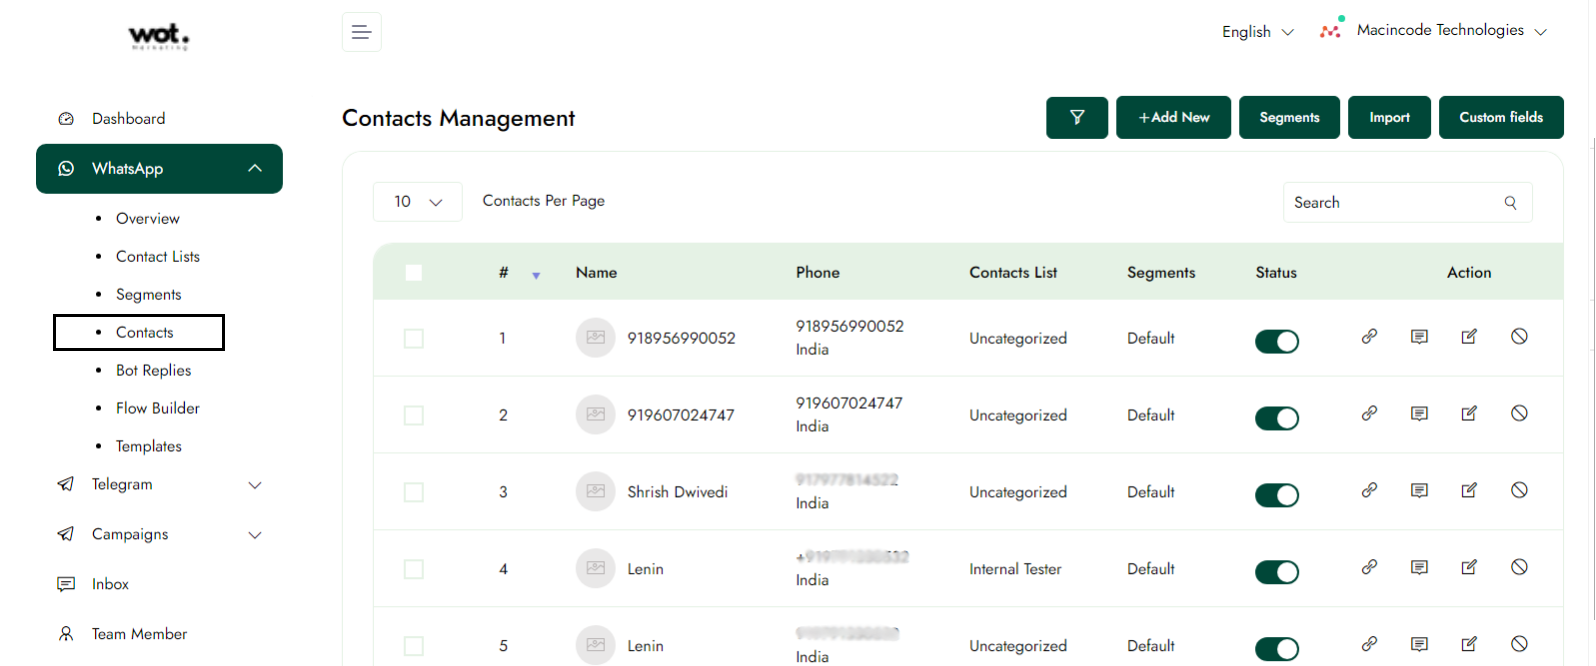
Create New Contacts
Step-1:
Once logged in, click on WhatsApp, select Contacts, and then click the "New Contact" button to create a new user.
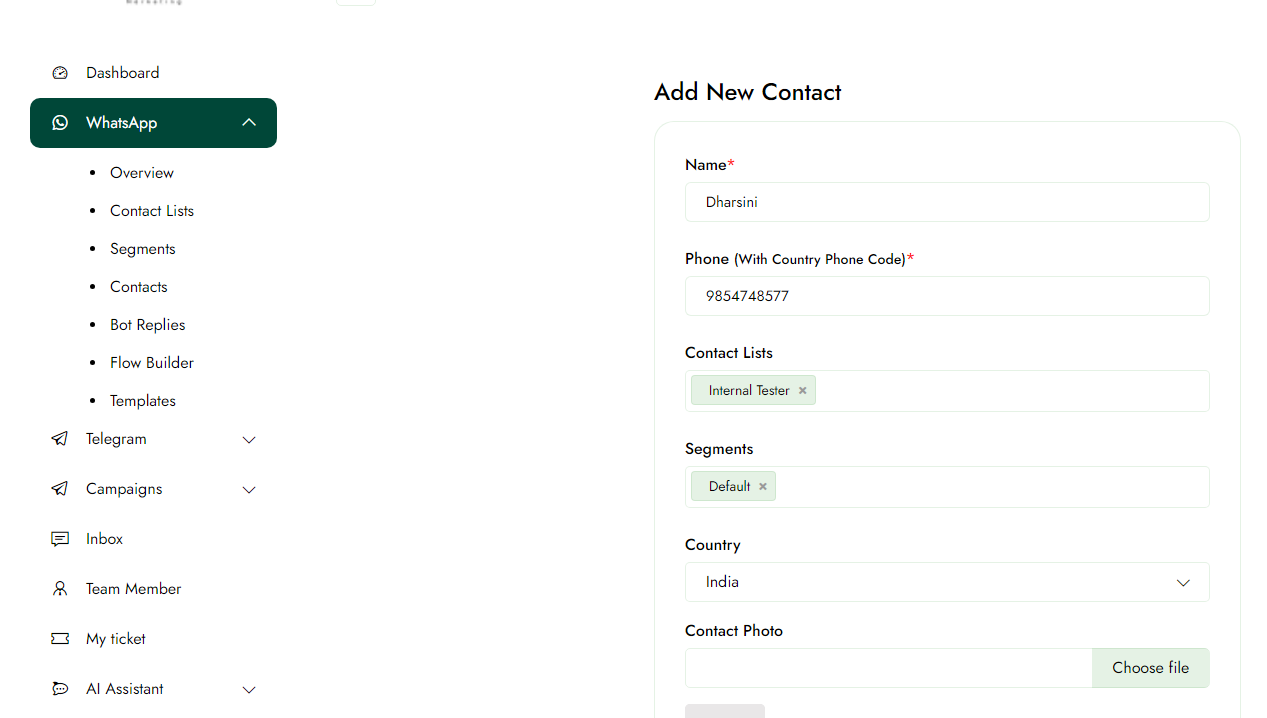
Step-2:
After completing step 1, click the "Add New" button, fill in the new contact information, and then click the "Save" button to save the details.
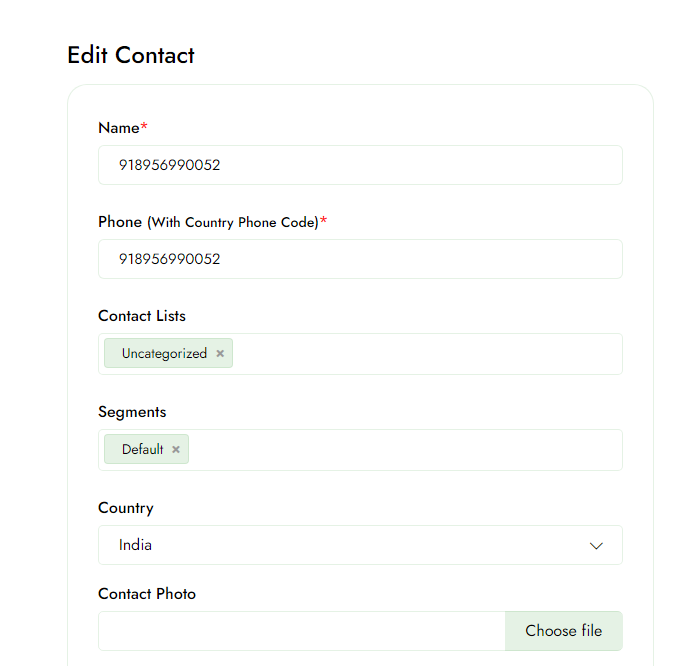
Edit User contacts
The article outlines the procedures necessary to update account information on the WhatsApp marketing platform.
Step-1:
Once logged in, click on Contacts in the left panel.

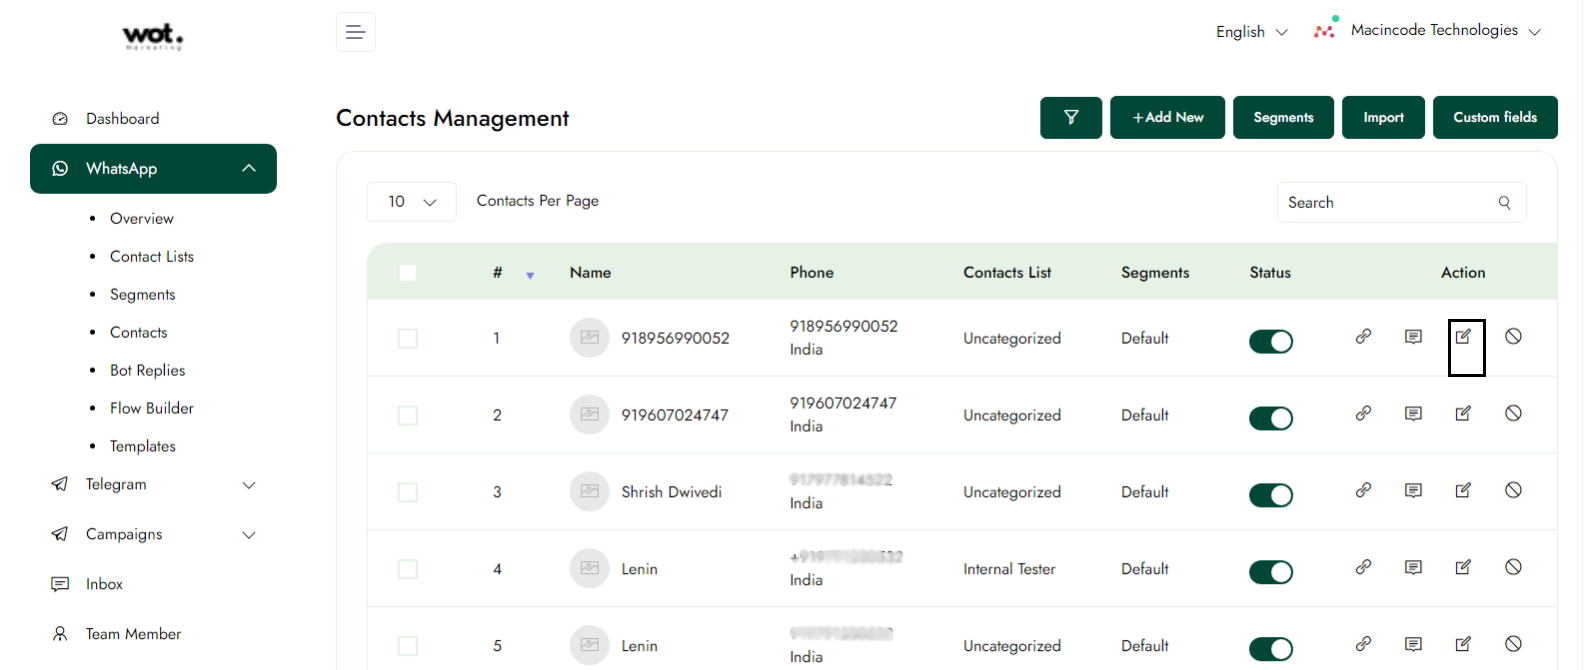
Step-2:
After completing step one, click on the contact whose information you want to edit, and then click the edit icon.
Step-3:
Edit the information and click the update button; the information will be updated successfully.
Delete User contacts
The article outlines the procedures necessary to Delete account information on the WhatsApp marketing platform.
Step-1:
Once logged in, click on Contacts in the left panel.
Step-2:
After completing step one, click on the contact you wish to delete, then click the delete icon. The user contact will be deleted successfully.

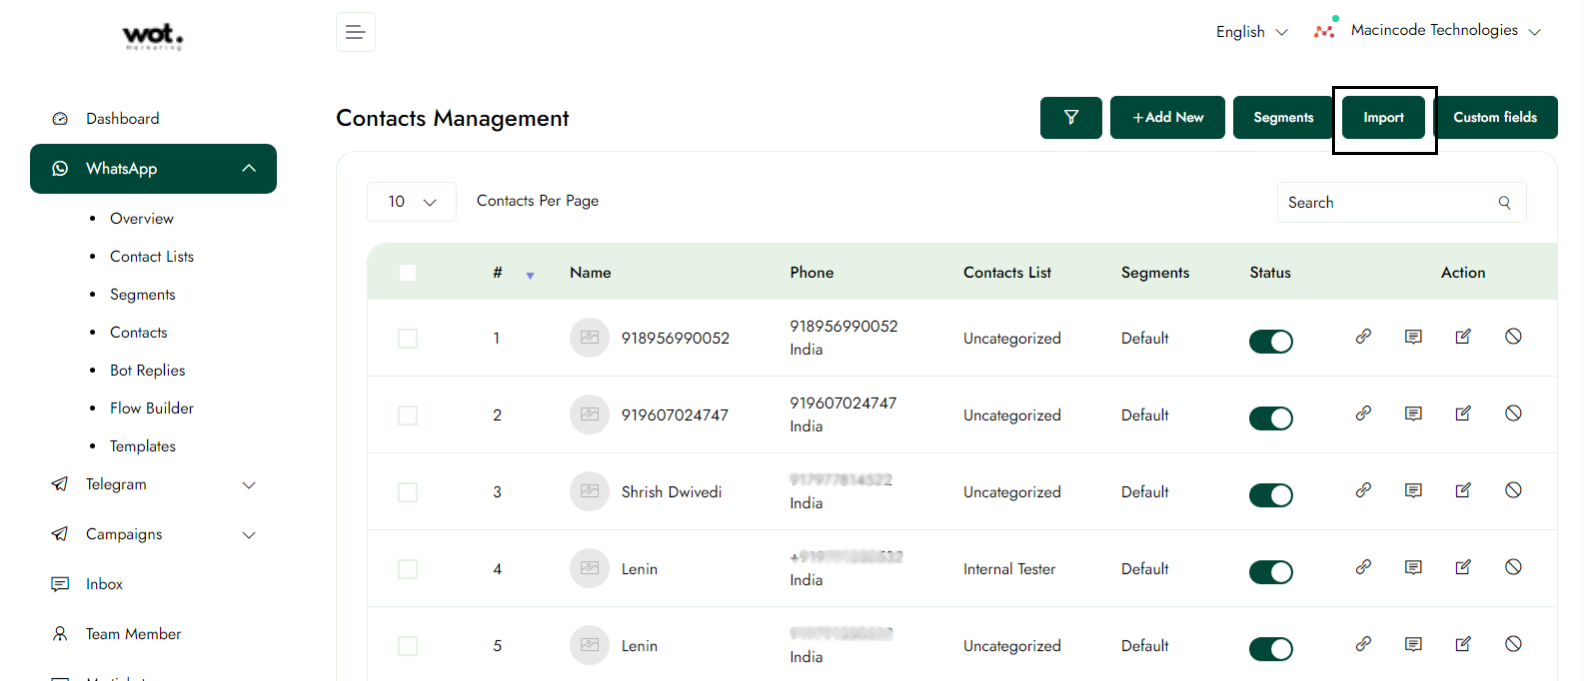
Import contact
This article outlines the process of Importing a Bulk Contact within a WhatsApp marketing platform. It includes the necessary prerequisites and dependencies required to execute this feature, as well as a glossary and definitions of domain-specific terms related to the process of creating a Contact.
Step-1:
Once logged in, click on Contacts in the left panel.
Step-2:
Click the Import button to upload files from your computer containing bulk contact information. You can either choose a file to import the data or enter the bulk information in the tabular column provided on the import page.

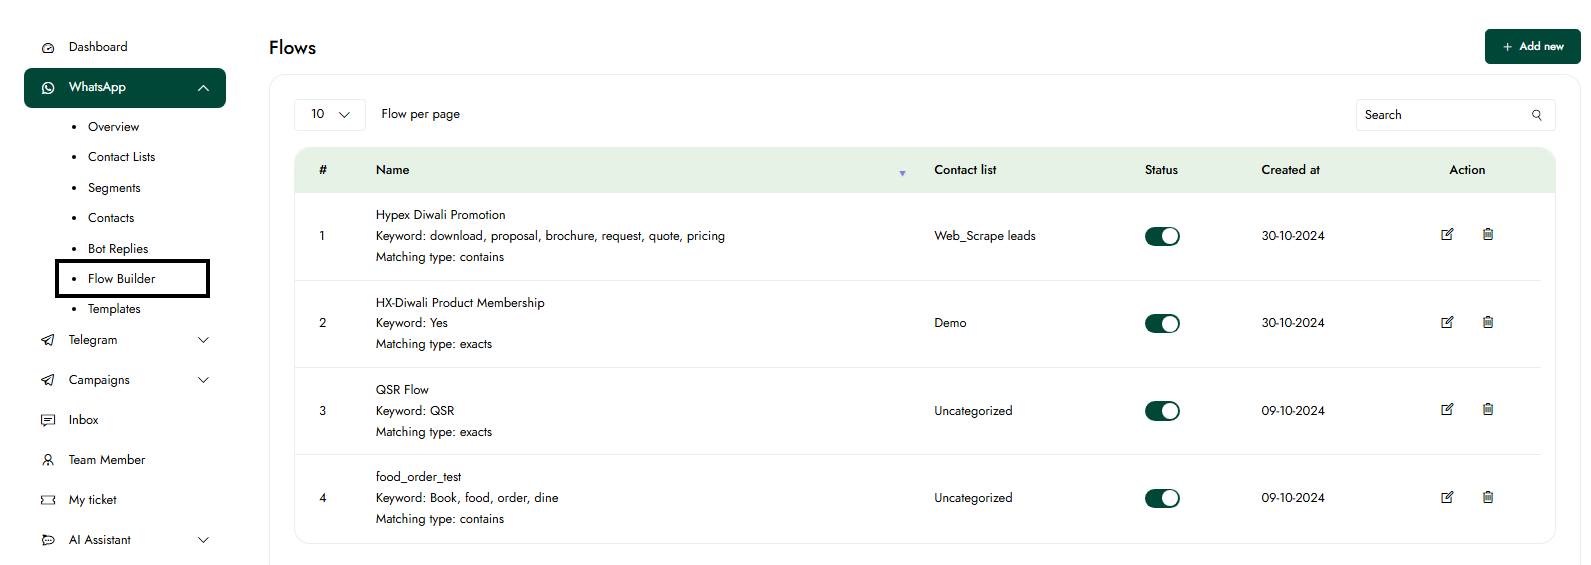
Flow Builder
Pre-requisites
Before creating the flow builder, make sure you have a contact list that includes numbers. After saving the flow, assign the contact list so that only those numbers have access to view the created flow on WhatsApp by entering the specified keyword.
Create Flow Builder
This article introduces a powerful feature that streamlines the process of creating promotional message sequences.
Key features
- Complete end-to-end promotional sequence creation
- Customizable messaging flows
- Instant flow visualization
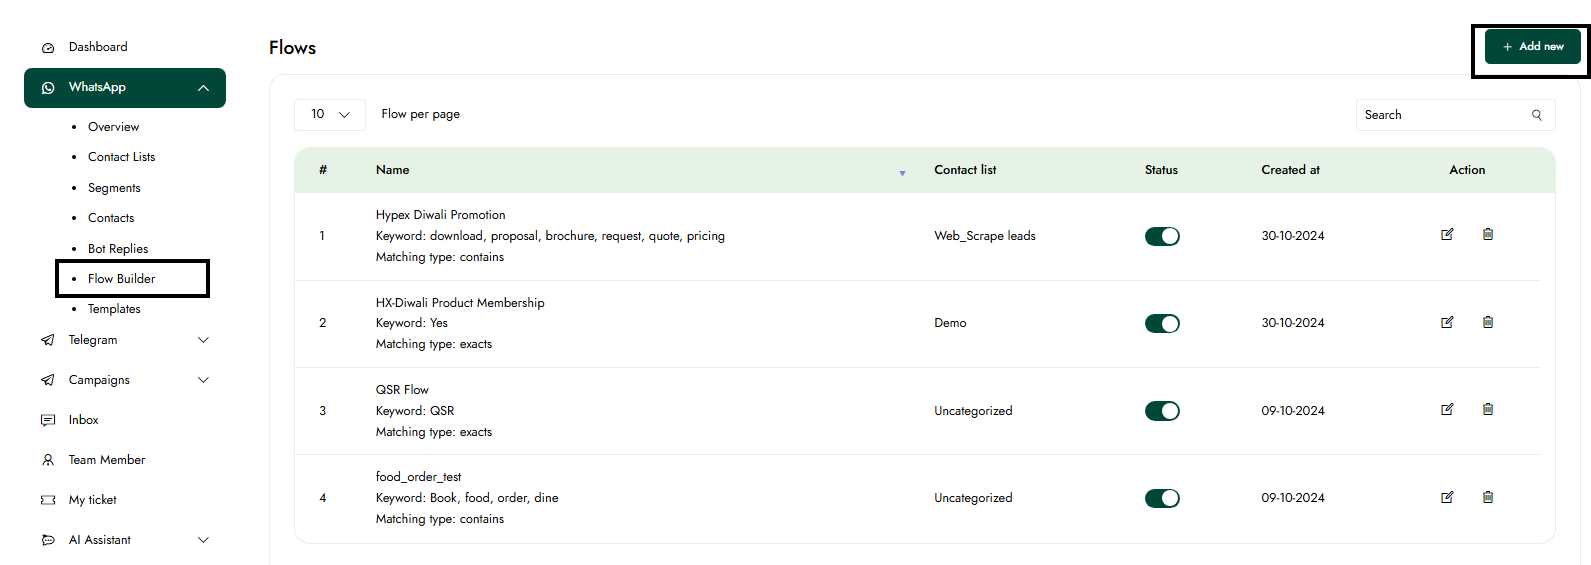
Step-1:
After logging in, select "WhatsApp" from the left panel, then click on "Flow Bulider" to create a new Flow Bulider.
Step-2:
Click the "Add New" button to create a new flow builder for your promotions.
Step-3:
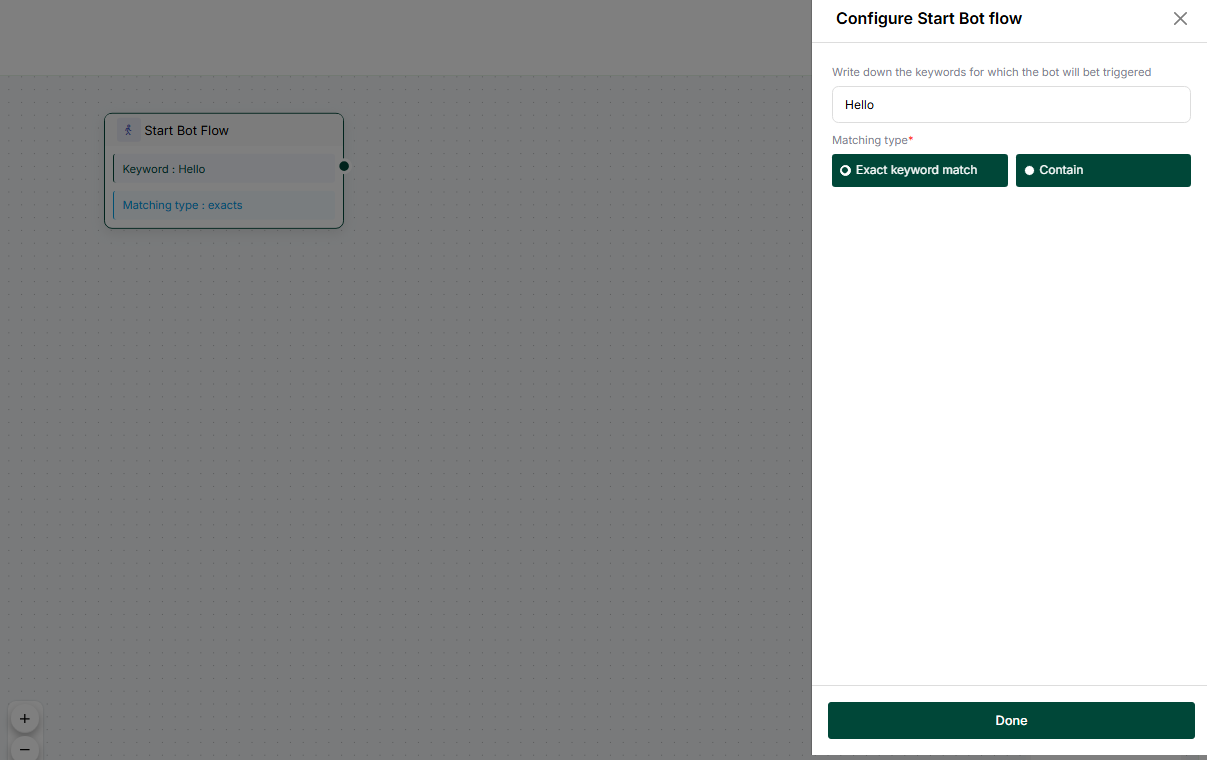
A "Start Bot Flow" node, which is the beginning point of any flow.
- Keyword: The trigger word for this flow
- Matching type: "Exact or Contains" (This means it will only trigger if the specified matching type is met).
Step-4:
Drag and drop components from the left panel onto the flow canvas to begin creating flows for your promotions. Specify the delay in reply (in seconds) and provide the flow content.
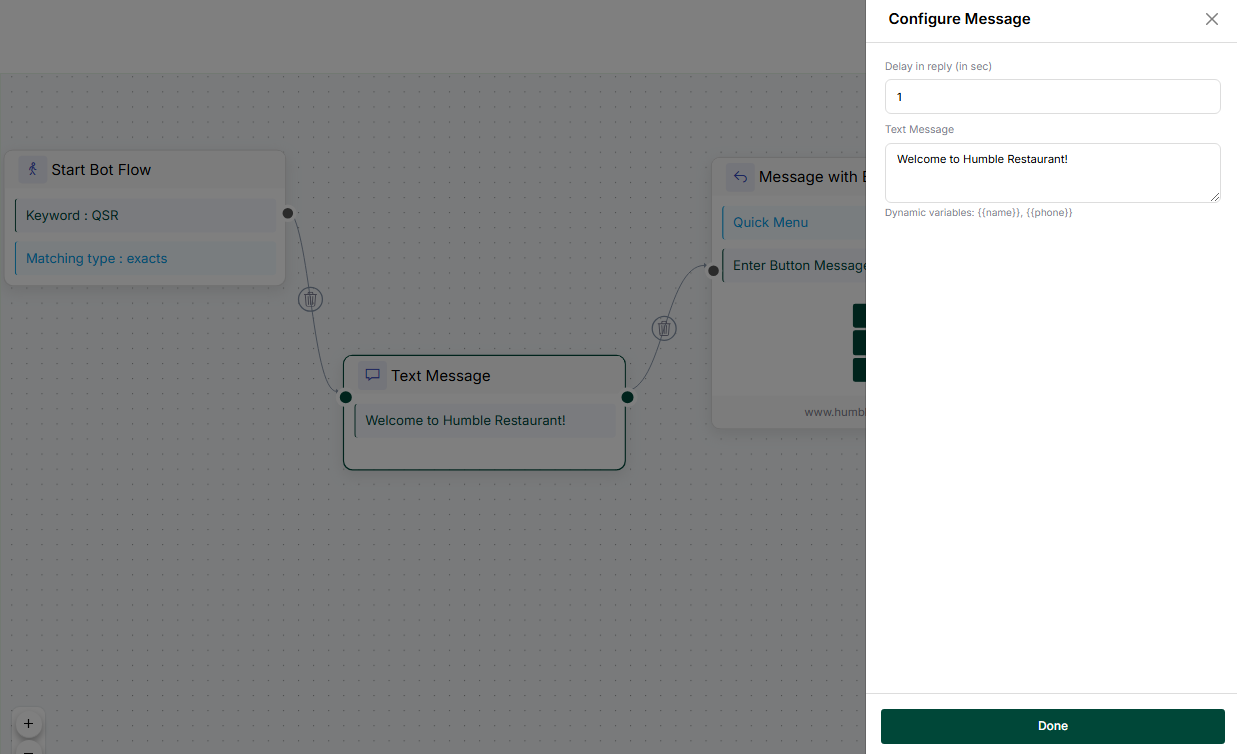
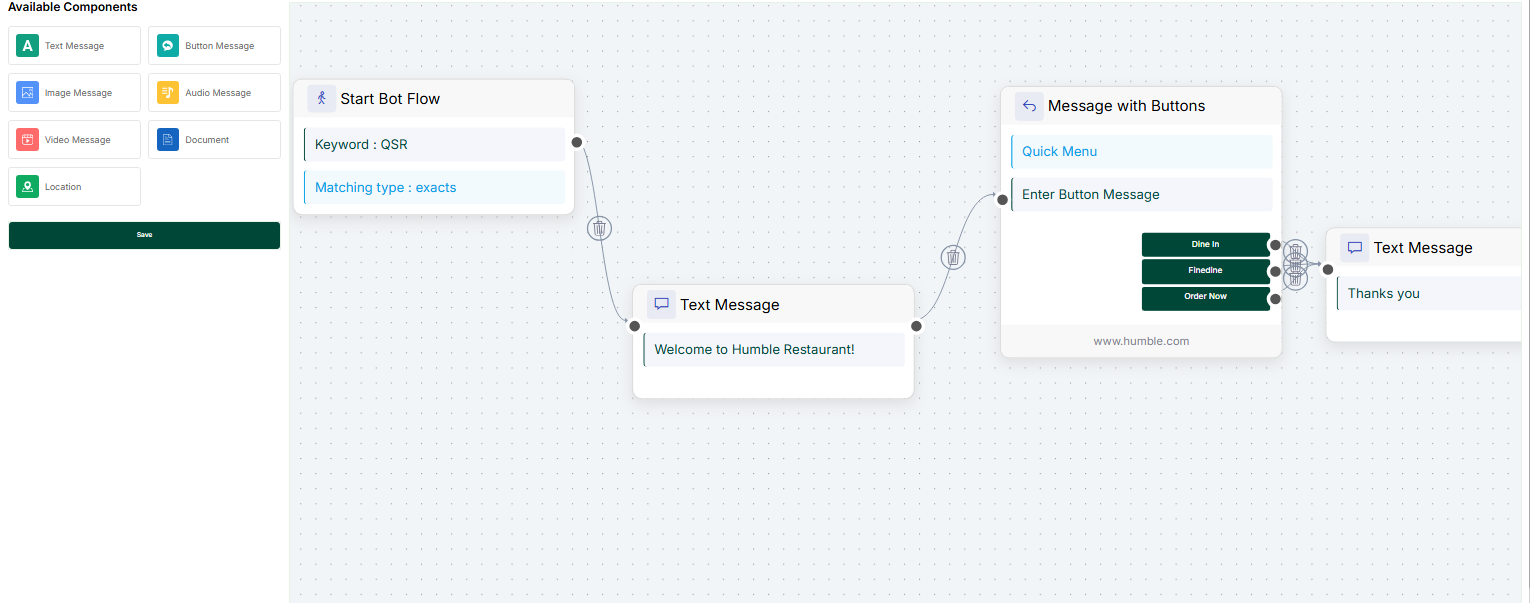
Note: Provide the lines of the flows so that it can respond according to the established flows. You can delete a specific card by clicking the delete icon next to it in the flow lines.
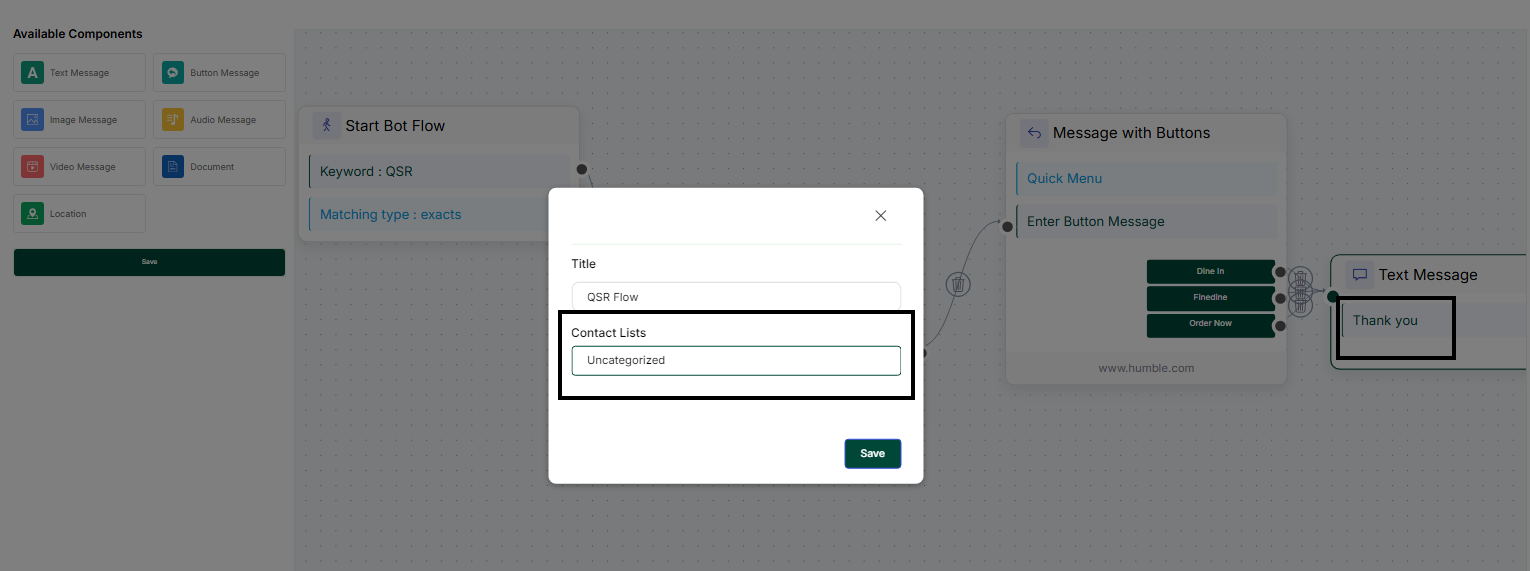
Step-5:
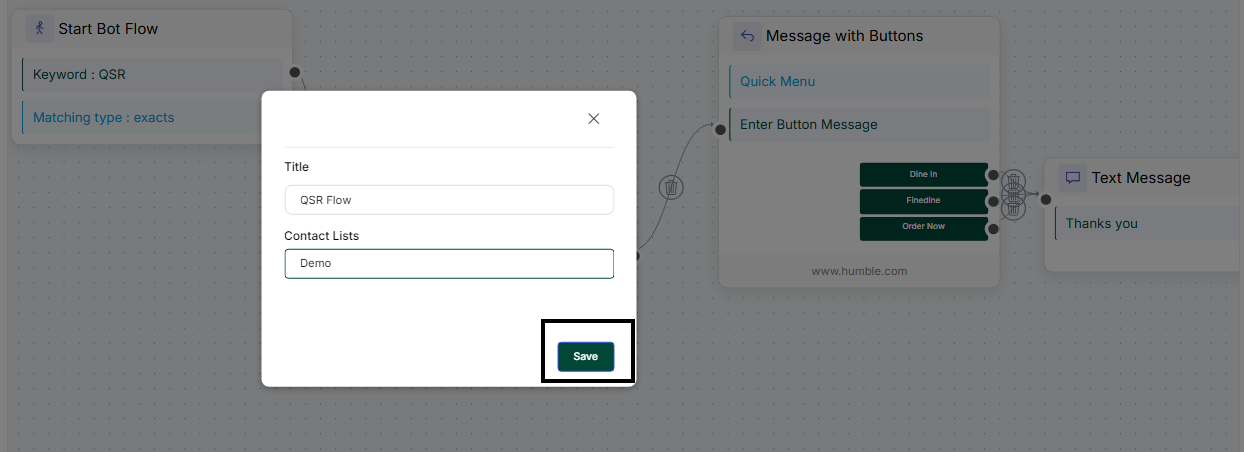
Click the "Save" button to save the created flow. A pop-up will appear where you can enter the title for the flow and assign the contact list. All available contact lists will be shown in a dropdown menu for you to choose from. Once you’ve made your selections, click "Save" again.

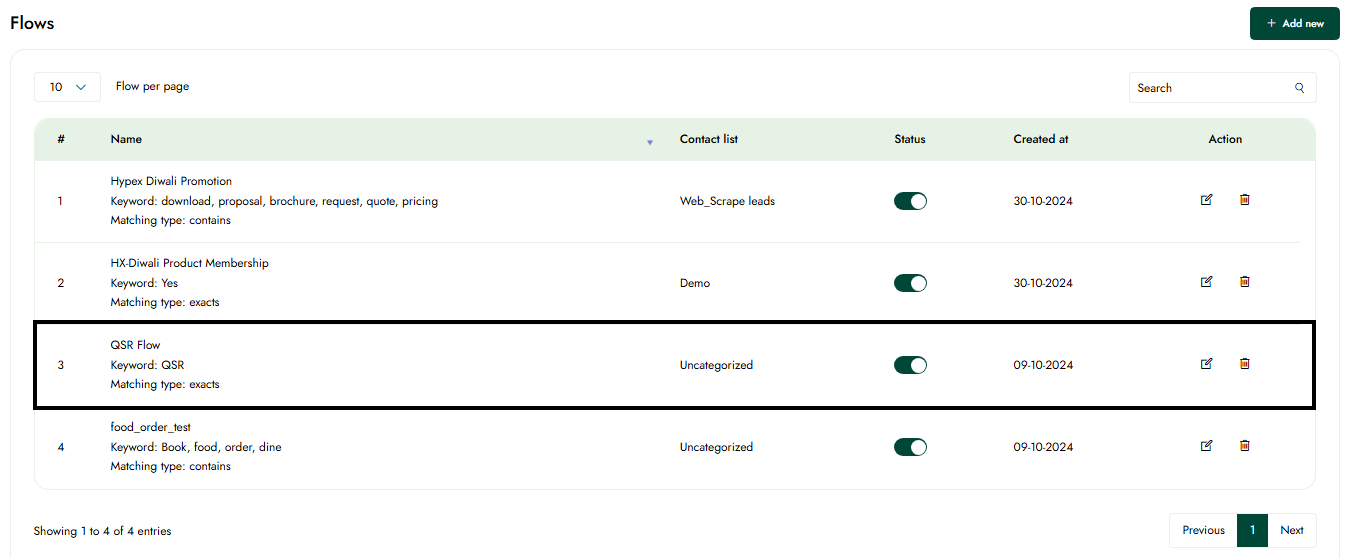
Step-6:
After saving, the flow will be displayed in the list of the flows.
Edit Flow
Step-1:
After logging in, select "WhatsApp" from the left panel, then click on "Flow Builder" to edit an existing flow builder.
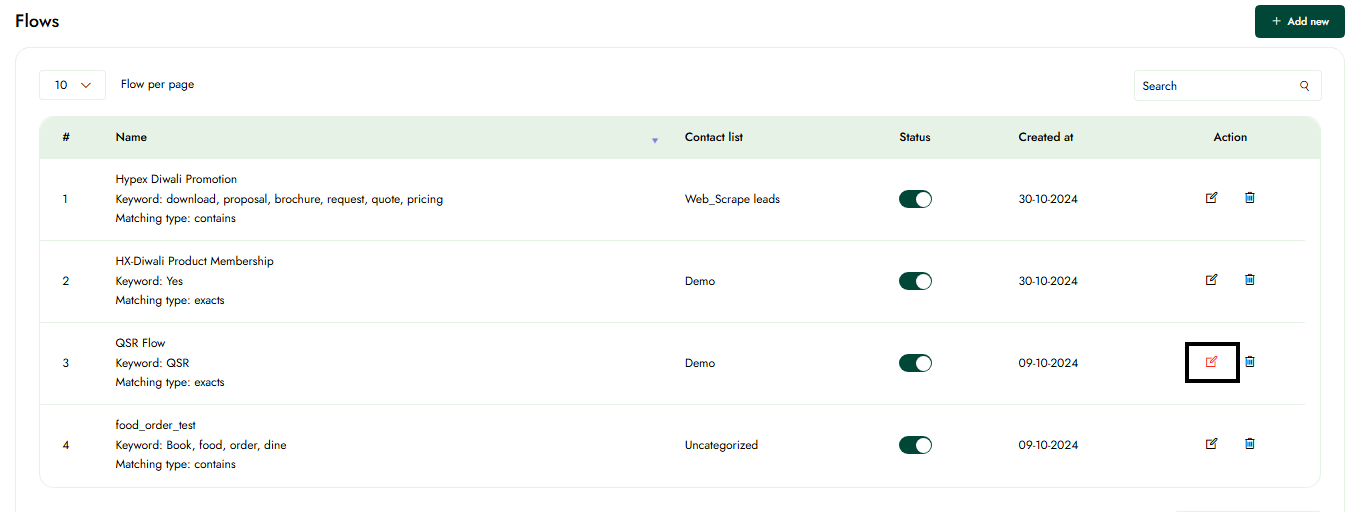
Step-2:
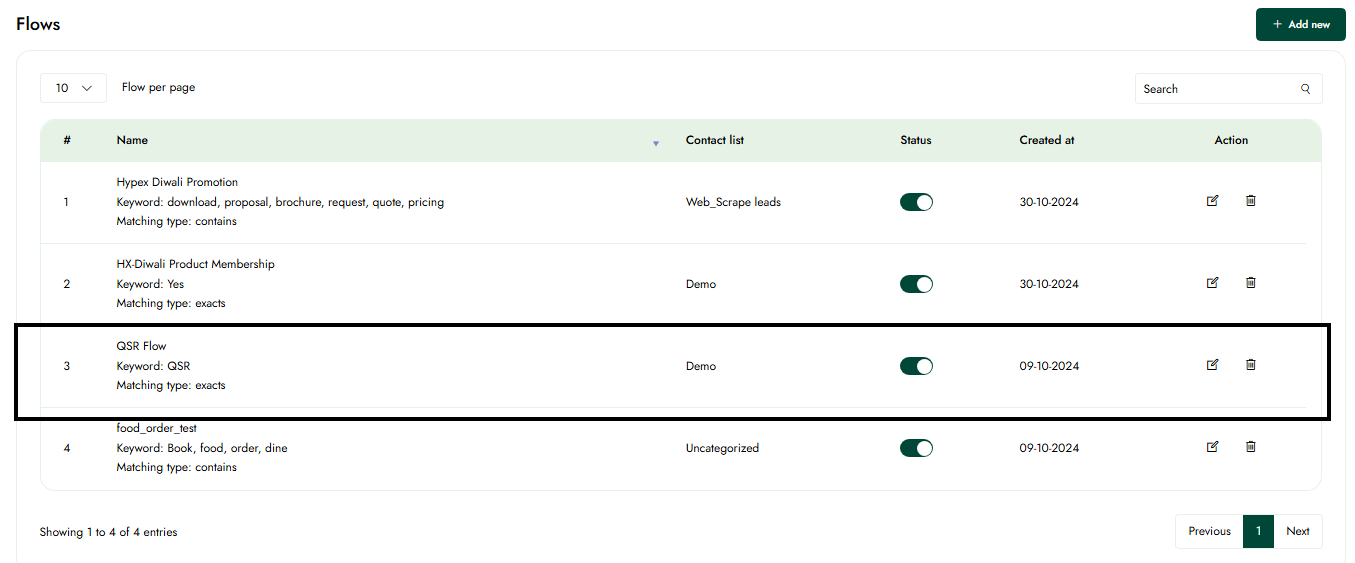
In the list of flows, click on the edit icon for the flow you want to modify.
Step-3:
After updating the information, click "Save," and the edited details will be displayed in the list of flows.
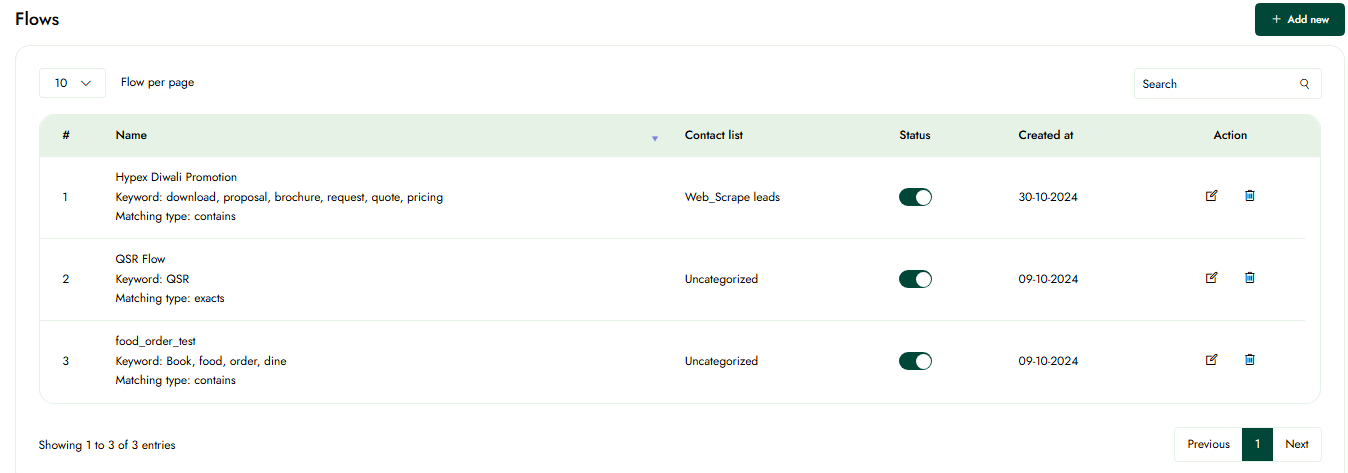
Delete Flow
Step-1:
After logging in, select "WhatsApp" from the left panel, then click on "Flow Builder" to edit an existing flow builder.
Step-2:
In the list of flows, click on the delete icon to remove the desired flow.
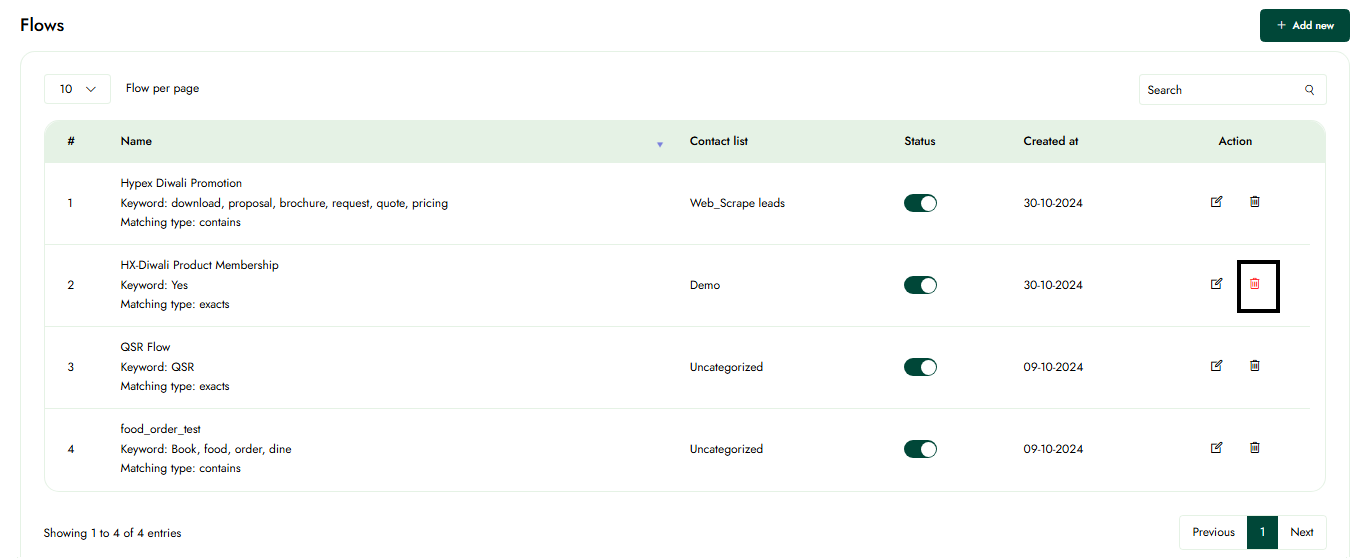
Step-3:
The deleted flow will no longer appear in the list of flows.
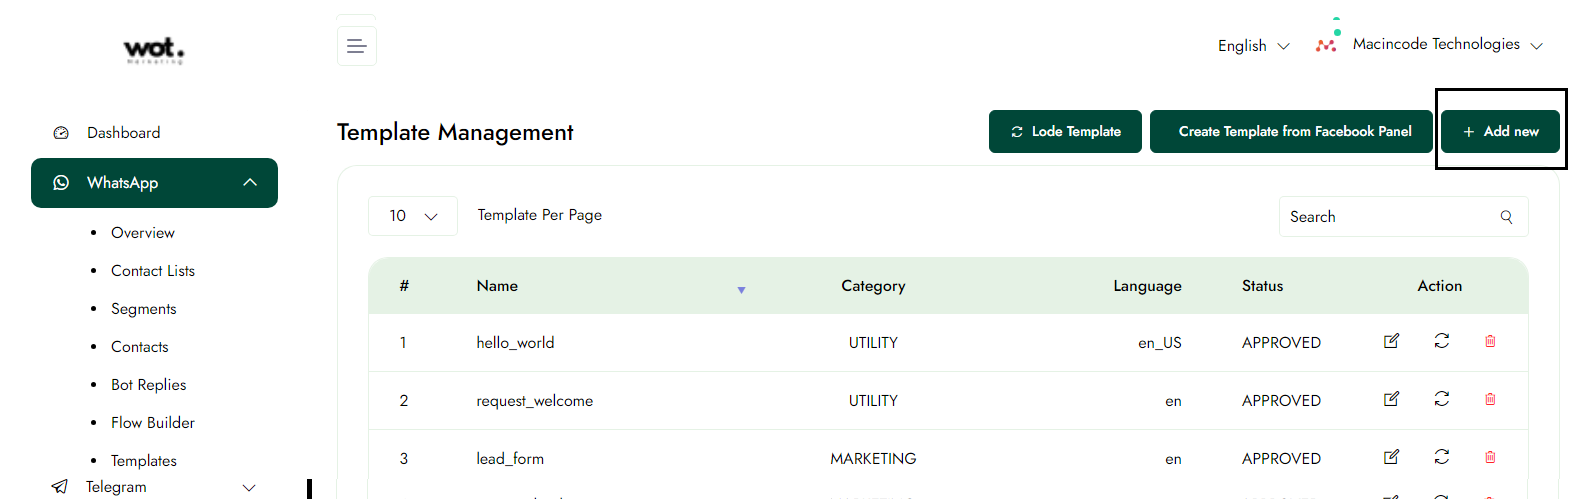
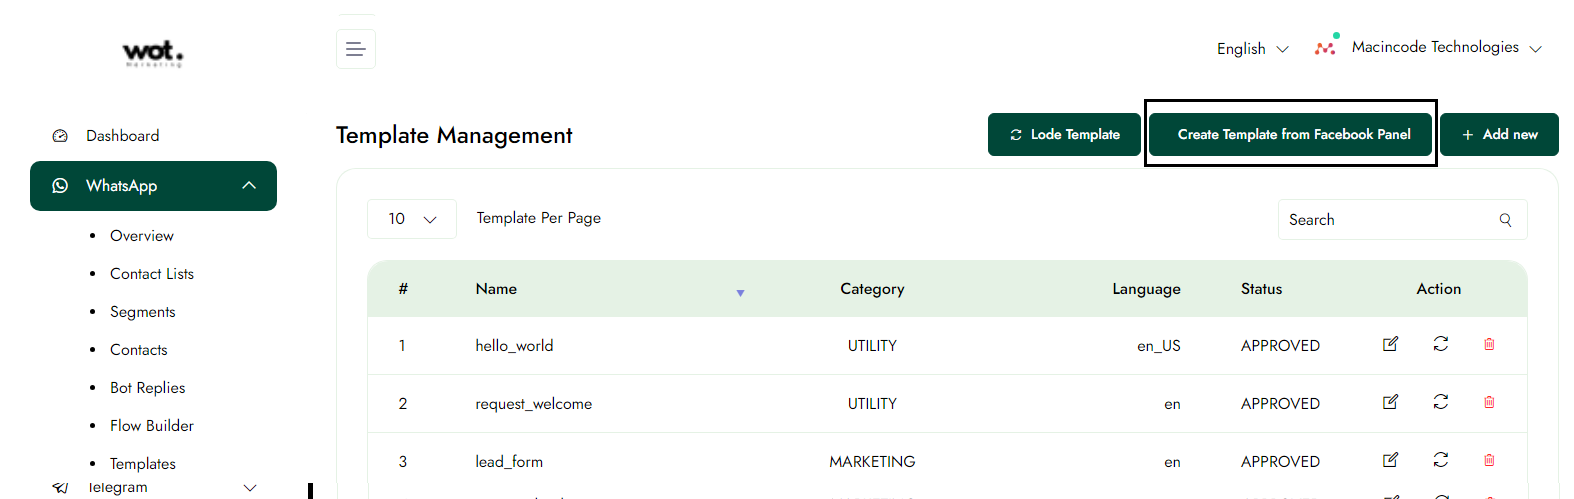
Templates
Create Templates
This article details the procedure for designing templates on a WhatsApp marketing platform.
Step-1:
After logging in, select "WhatsApp" from the left panel, then click on "Template" to create a new template.

Step-2:
Click on the "Add new" button and create the template in the given format.
Step-3:
After filling in all the required information in the form, click the "Sumbit" button. The new template will then be added to the list.
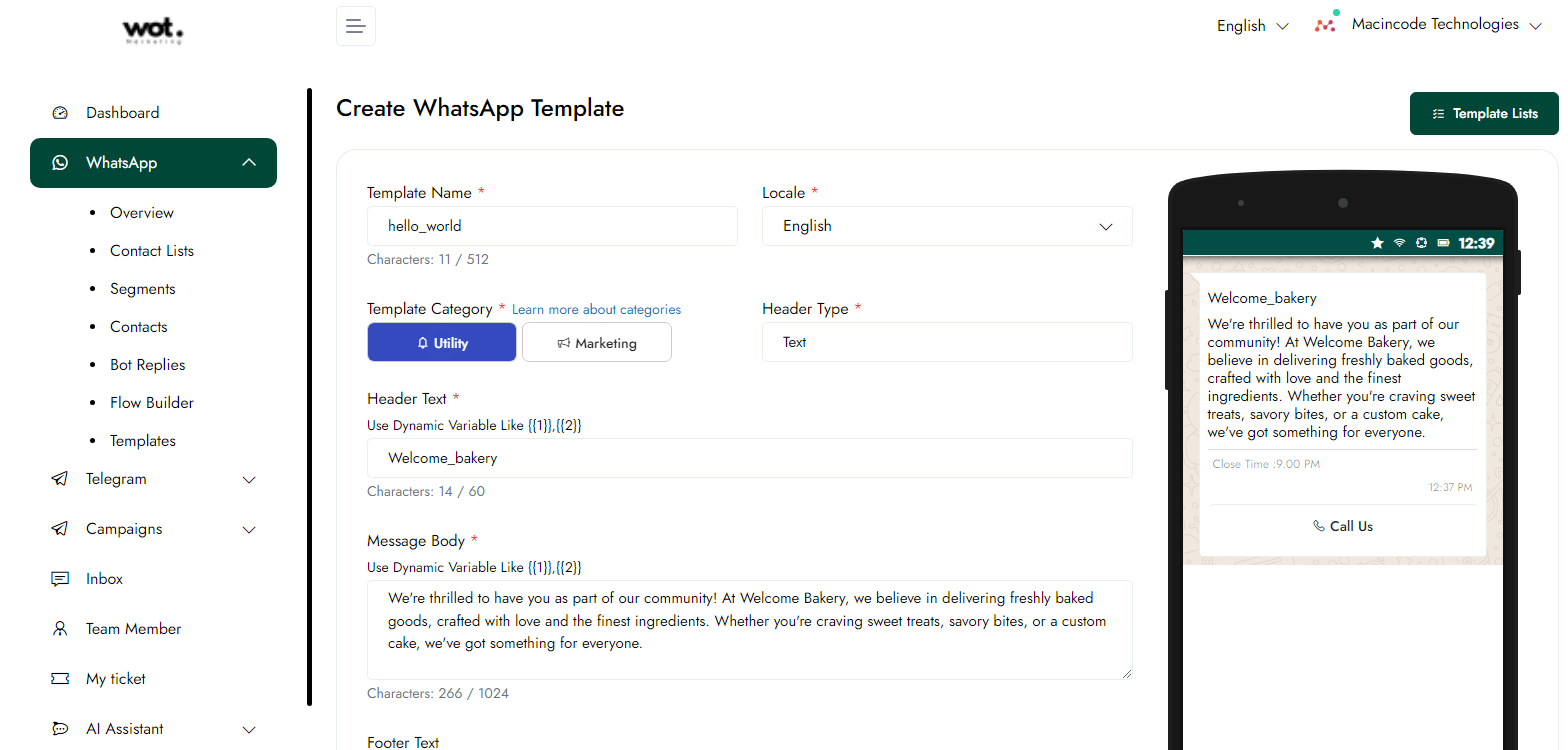
Step-4:
After creating the template, click the "load Templates" button to see it in the list. This action refreshes the page and displays the new template.

Note: Before creating a template on Facebook, you must first have a Meta Facebook account, as it is required to make the template creation process possible.
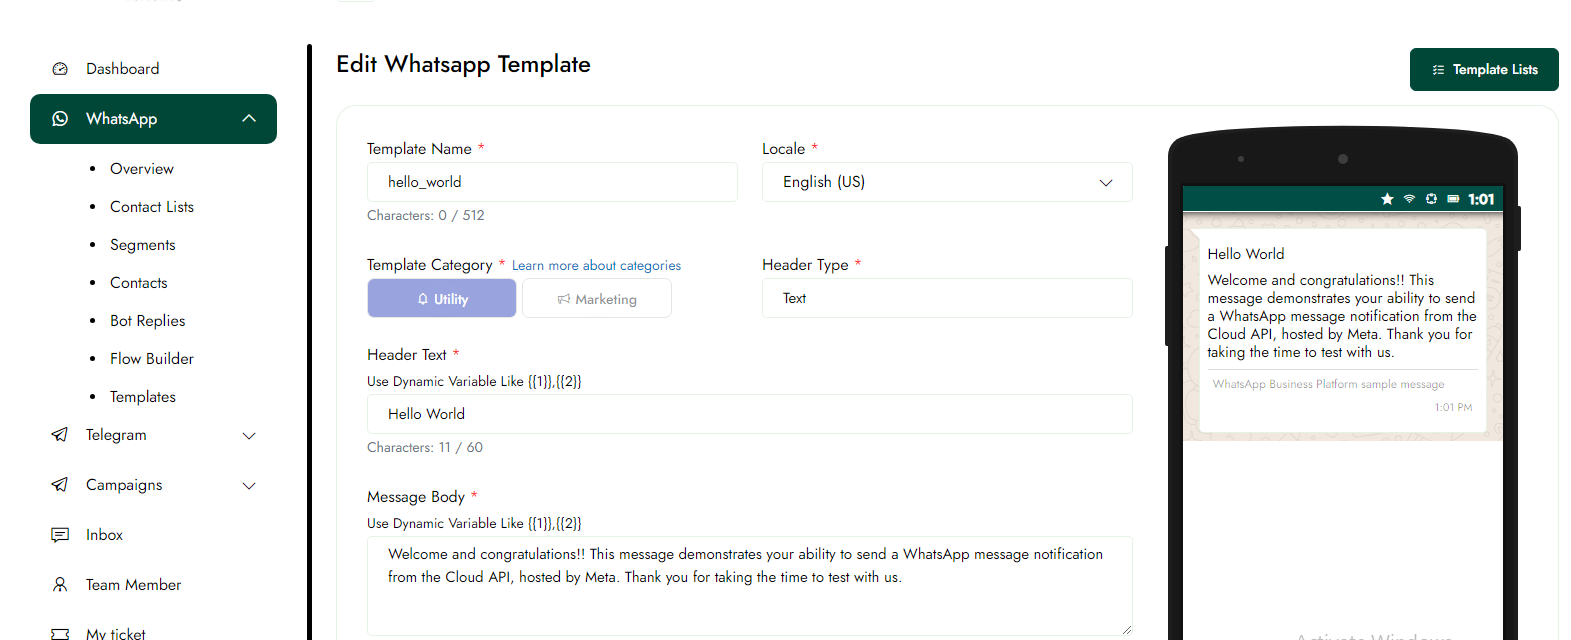
Update the Templates
This article details the procedure for editing the template. Once you have made your edits, you will only be able to make further changes after 24 hours.
Step-1:
Once logged in, click on Templates in the left panel.
Step-2:
To modify a template, click the Edit icon button to change the information.

Delete the Templates
This article details the procedure for Deleting templates on a WhatsApp marketing platform.
Step-1:
Once logged in, click on Templates in the left panel.
Step-2:
To delete a template, click on the delete icon in the top-right corner of the page and select "Delete." The deleted template will no longer appear in the list.

Inbox
Add notes in the chats
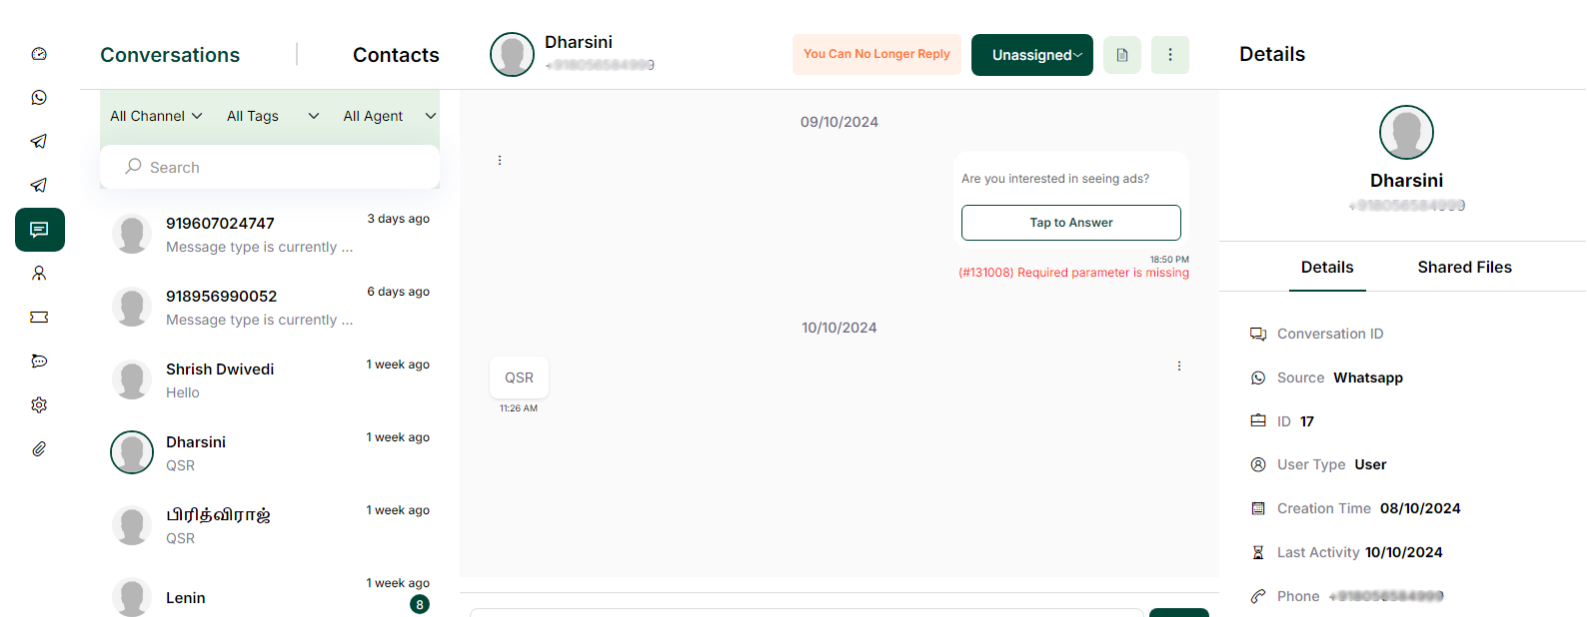
This article explains the process of initiating a chat with a user on a WhatsApp marketing platform. It includes the necessary prerequisites and dependencies required to start this interaction, along with a glossary defining key terms related to messaging within this platform.
Step-1:
Once logged in, click on inbox in the left panel.
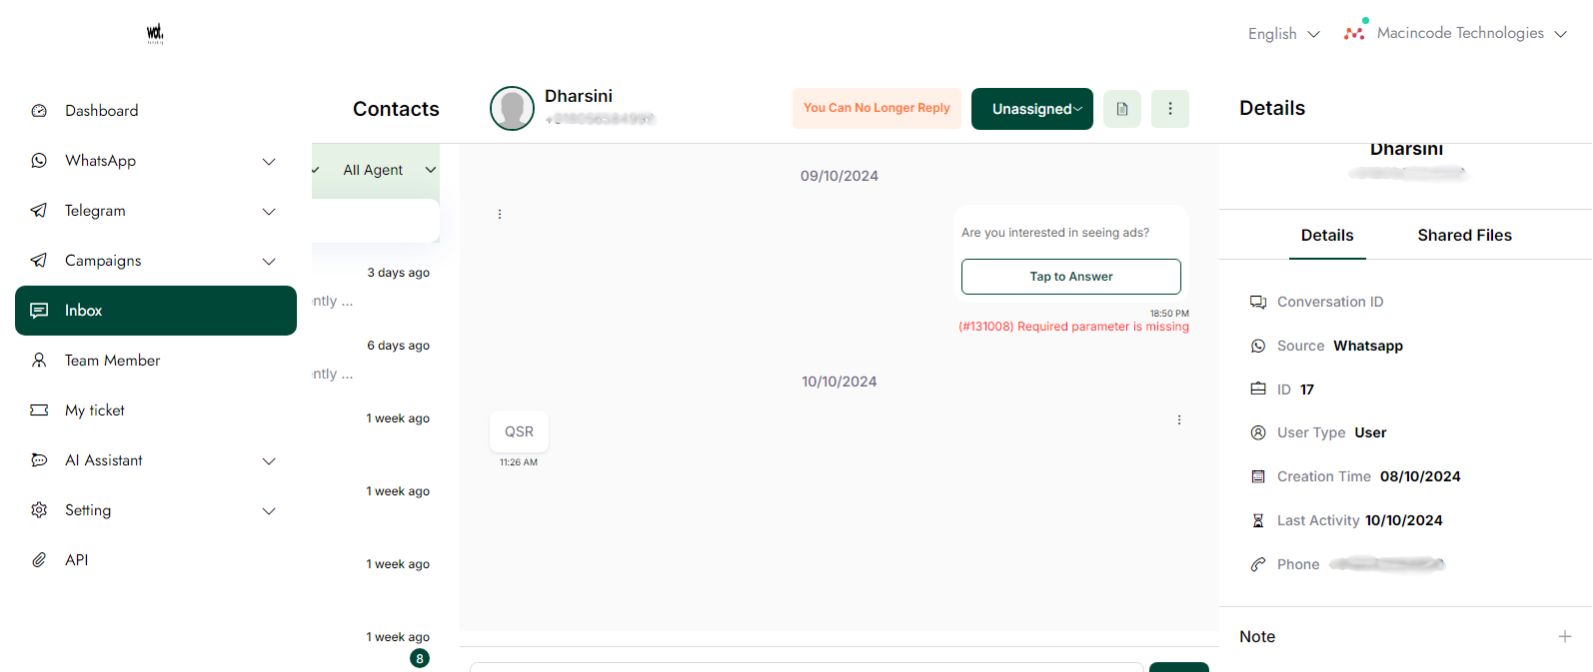
Step-2:
After completing step 1, click on "One User Chat" to enter notes for the specific user chat.
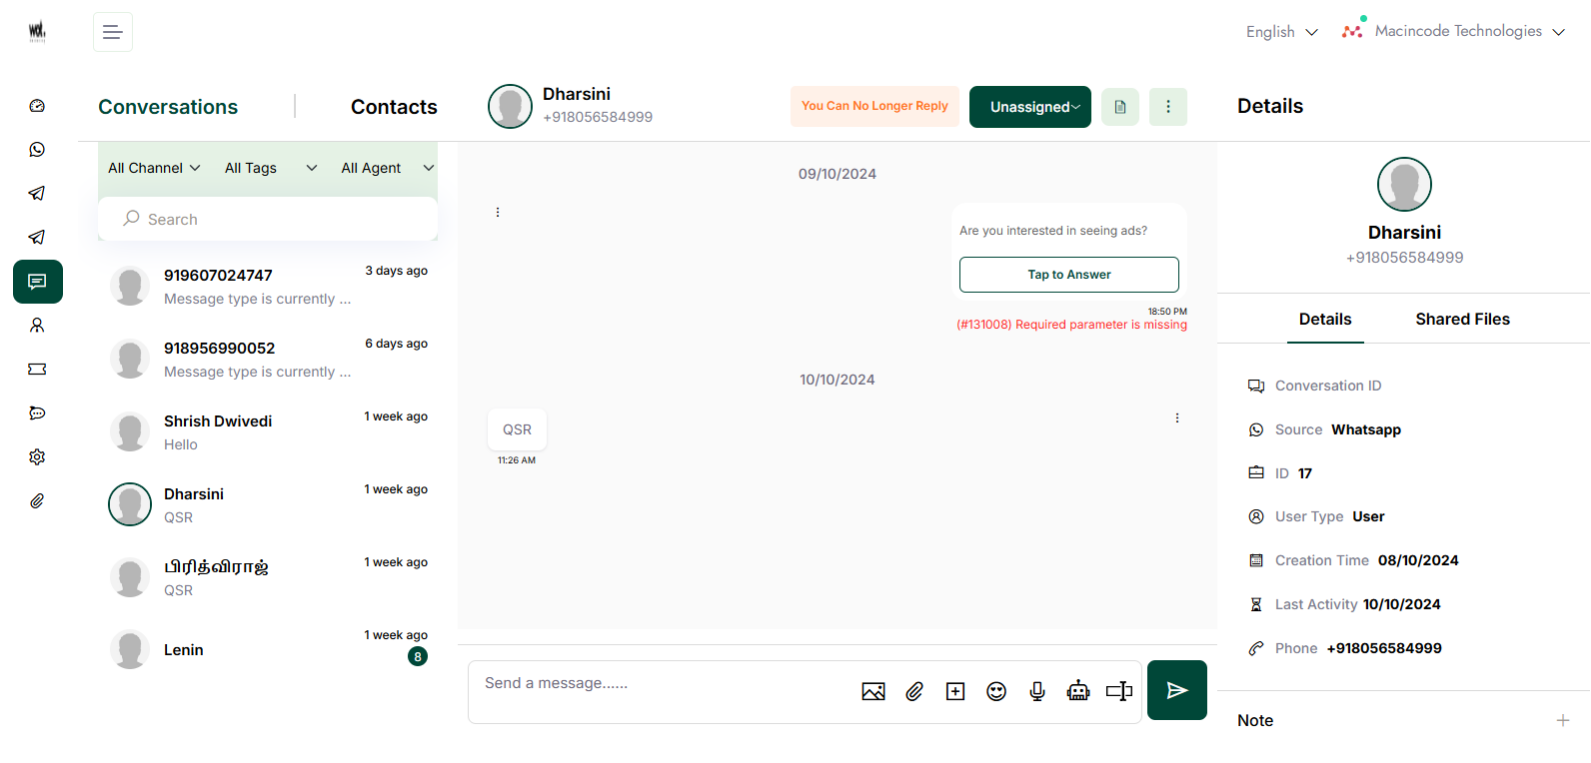
Step-3:
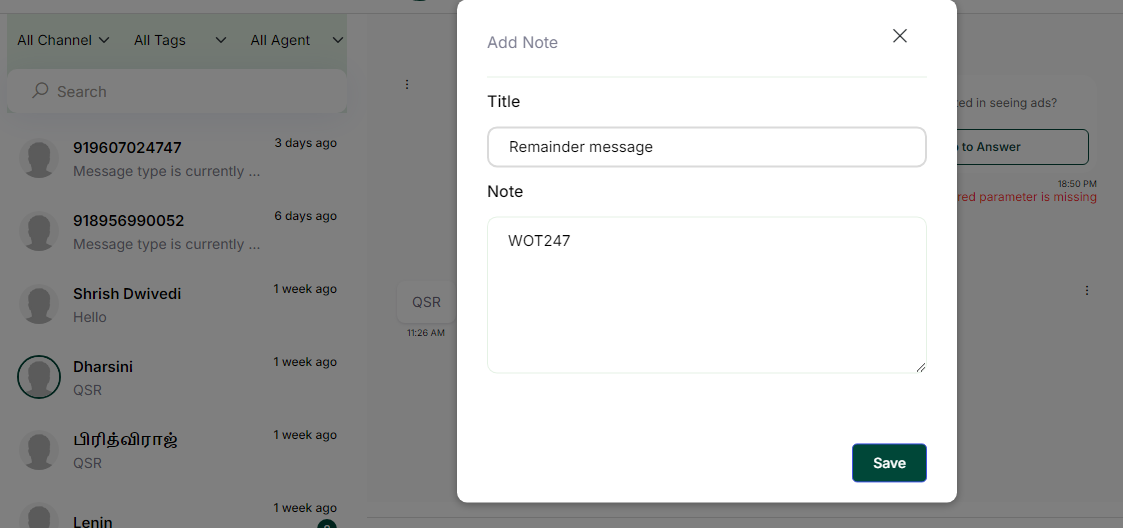
Click the + icon in the notes section to create notes in the chats.
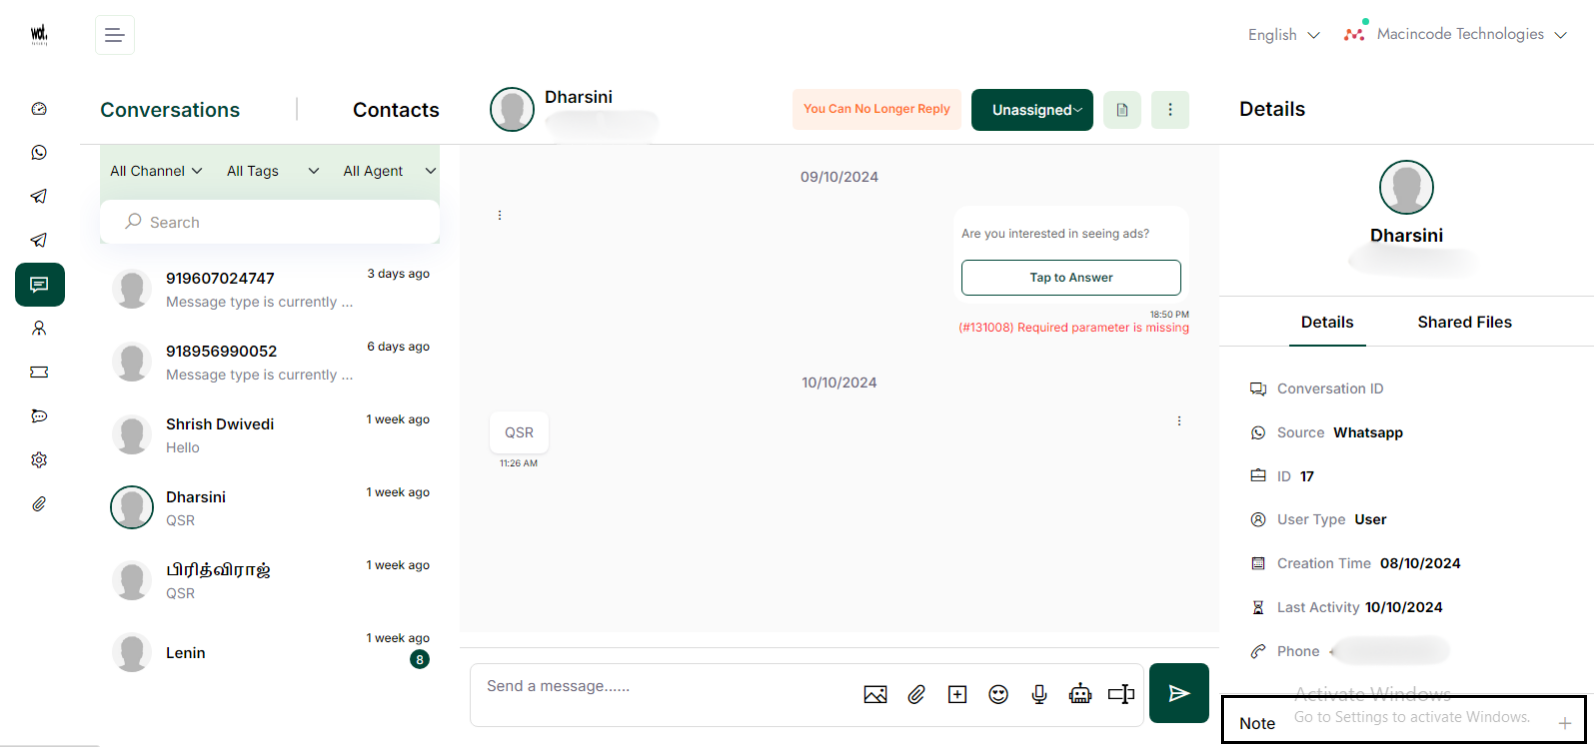
Step-4:
Click on "Notes," enter the content, click the save button, and the notes will be saved in the chats.
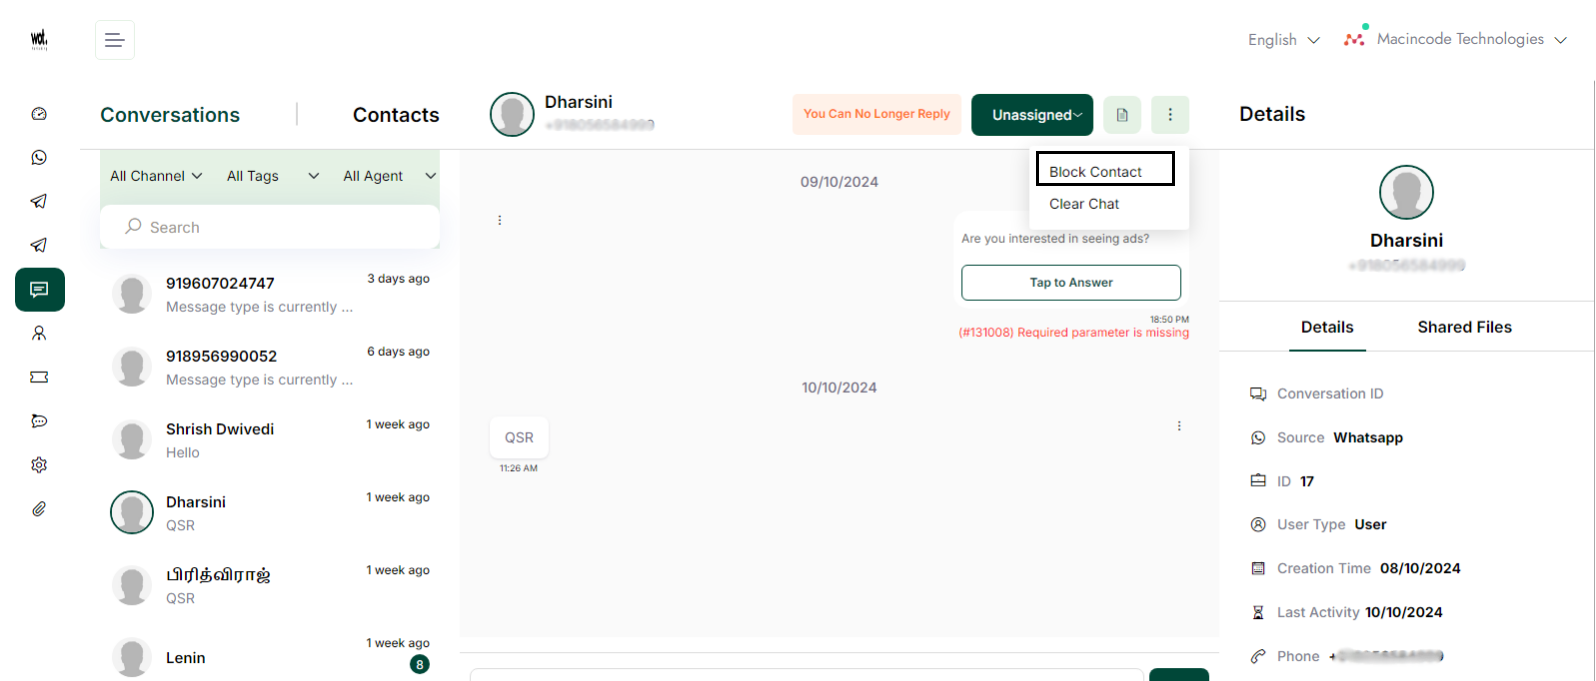
Block the chats
Step-1:
Once logged in, click on Inbox in the left panel.
Step-2:
After completing step 1, click on the "one user chat" to block the contact.
Step-3:
Click the three dots in the chat and select the "Block Contact" option in the top right corner to block the chat.
Clear the chat for the user.
Step-1:
Once logged in, click on "Inbox" in the left panel to clear the chat history.
Step-2:
After completing step 1, click on the "one user" to clear the chat.
Step-3:
Click on the three dots in the upper right corner, and then click on Clear chat.
Campaigns
Add Campaigns
This article explains the steps involved in creating campaigns on a WhatsApp marketing platform.
Note: We can create a campaign in two ways—one for WhatsApp and one for Telegram. Templates can be created for both platforms.
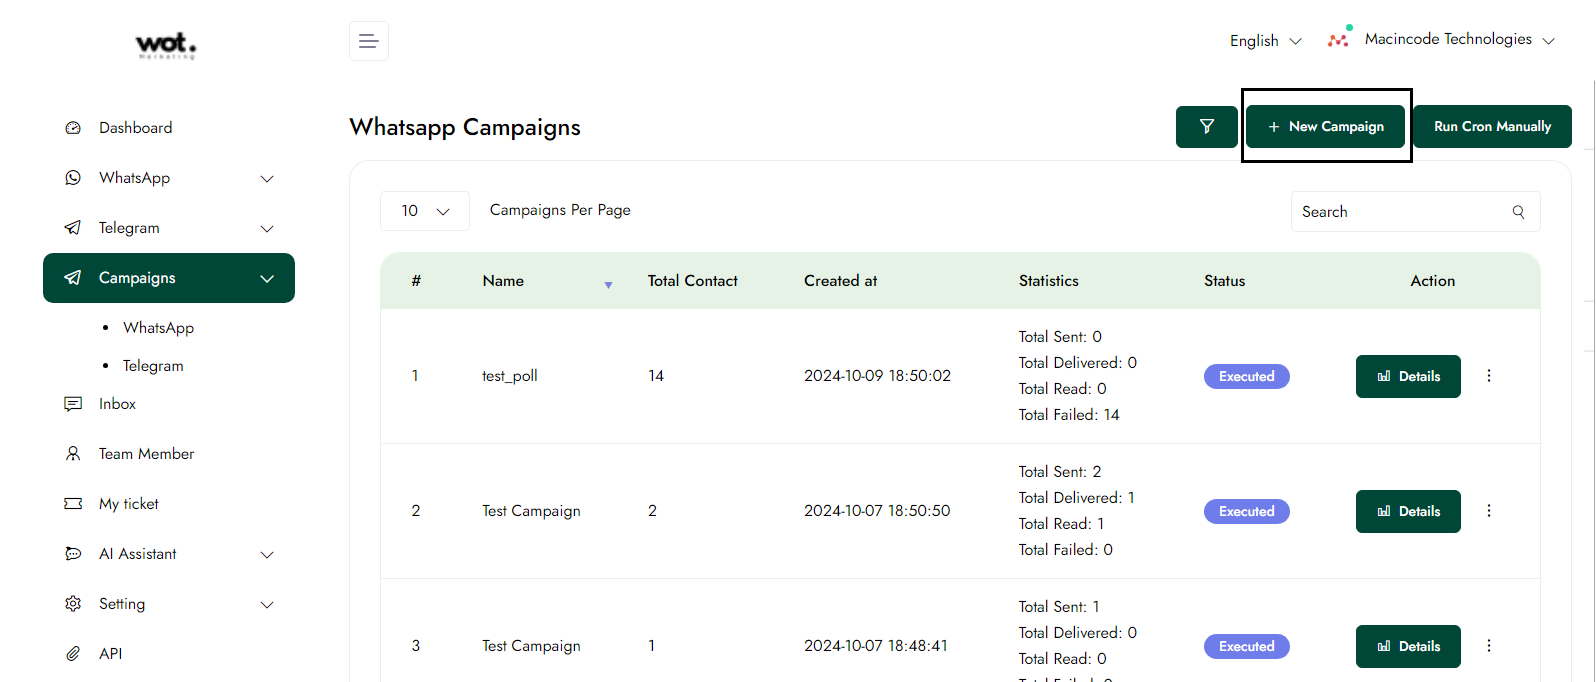
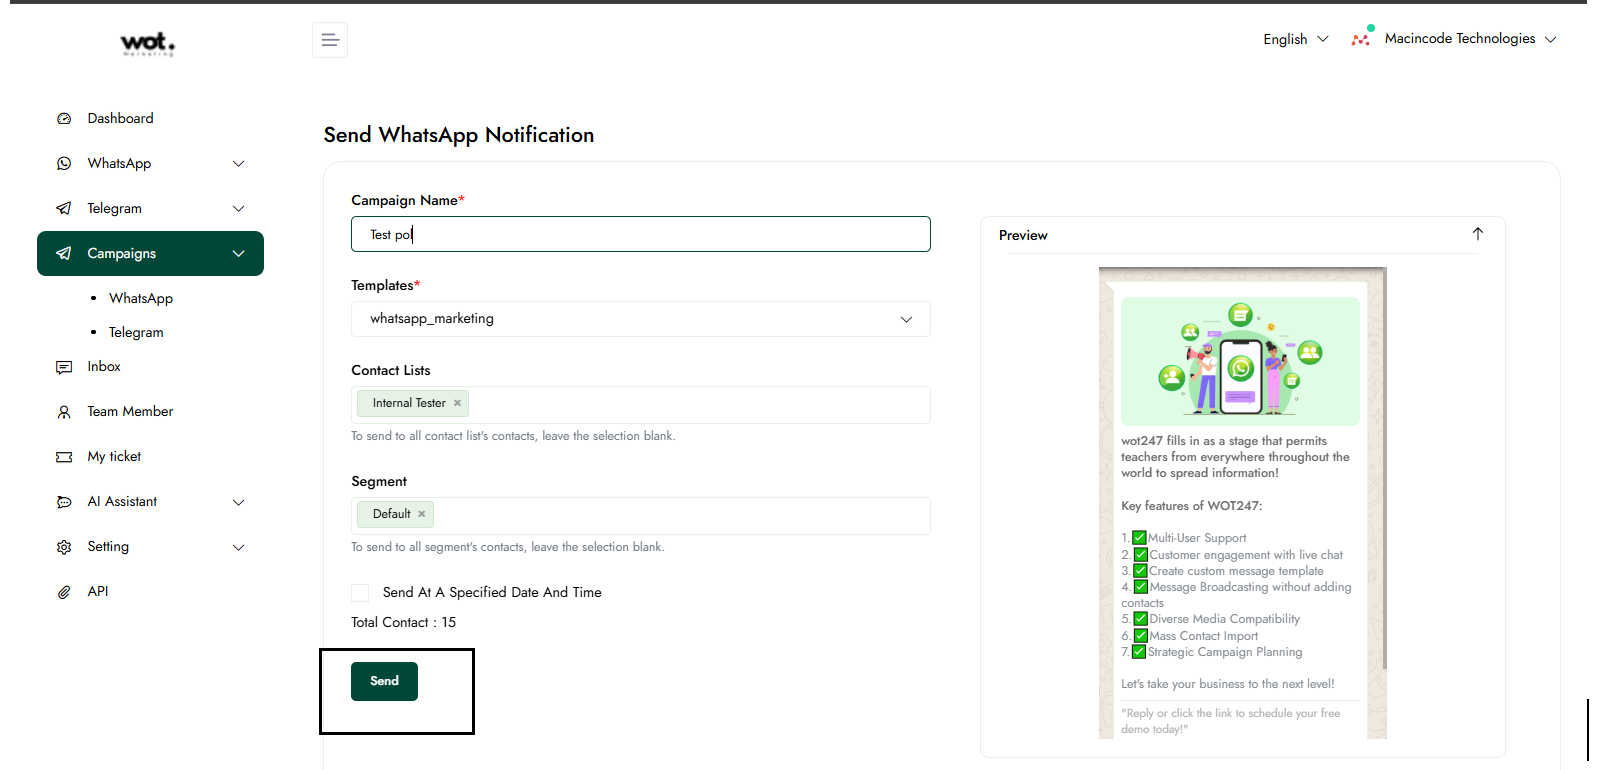
Step-1:
Once logged in, click on Campaigns in the left panel.
Step-2:
On the campaigns page, click on the "New Campaign" button.
Step-3:
After completing step 3, fill out the campaign form.
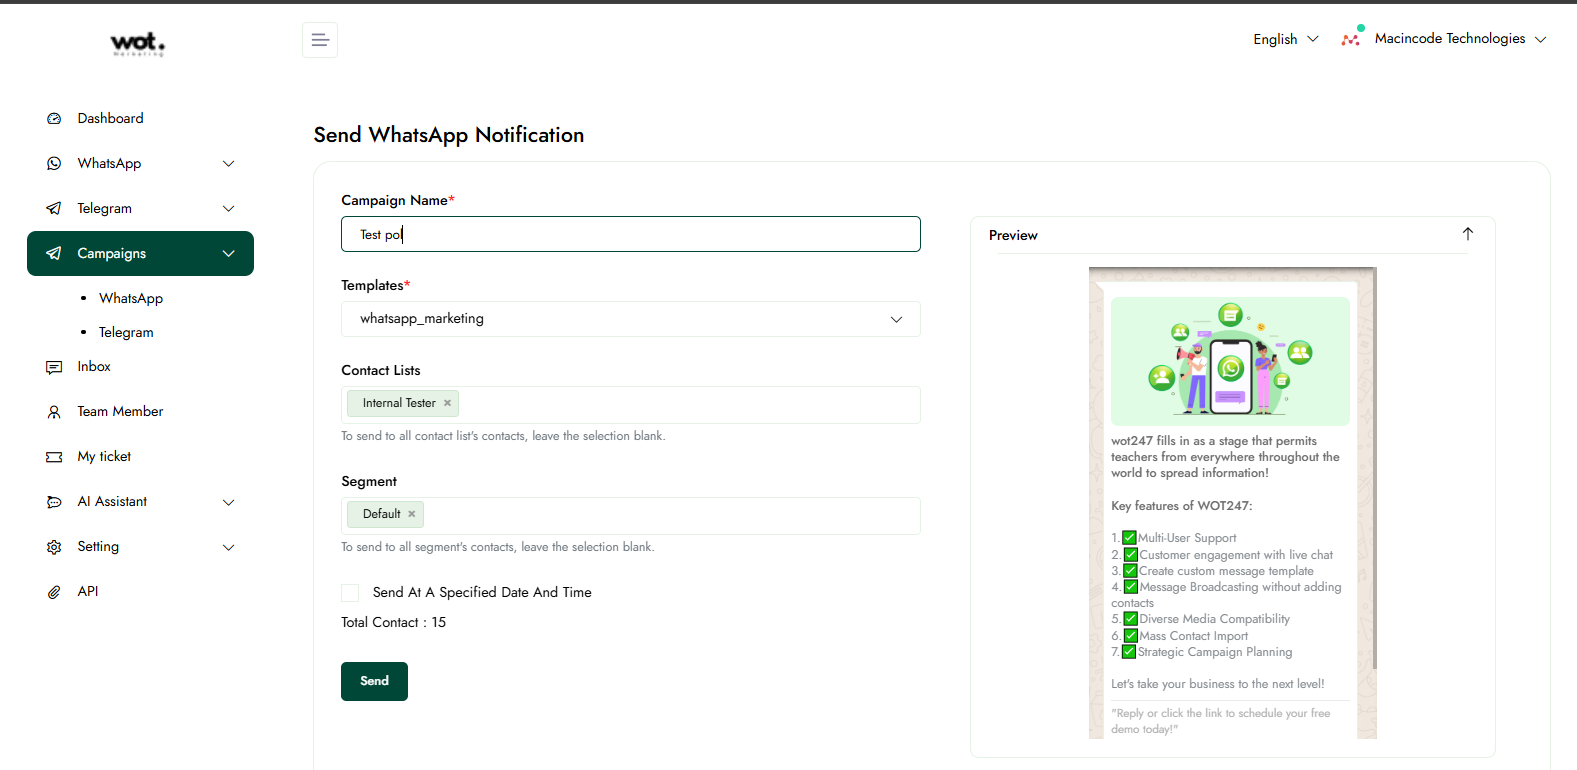
Step-4:
If we want to send the templates to the user, we can select templates and groups in the campaign form.
Step-5:
After completing step 4, click the send button. The templates will be sent to the user, and the list will show the details of the deliverables.
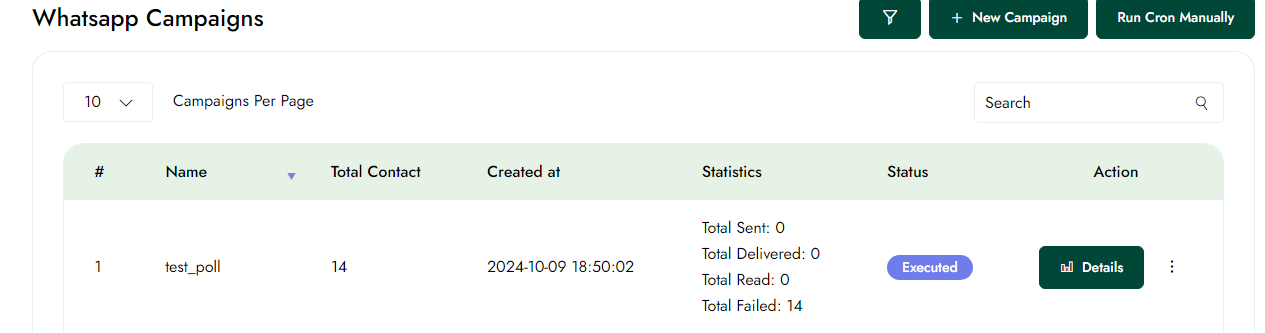
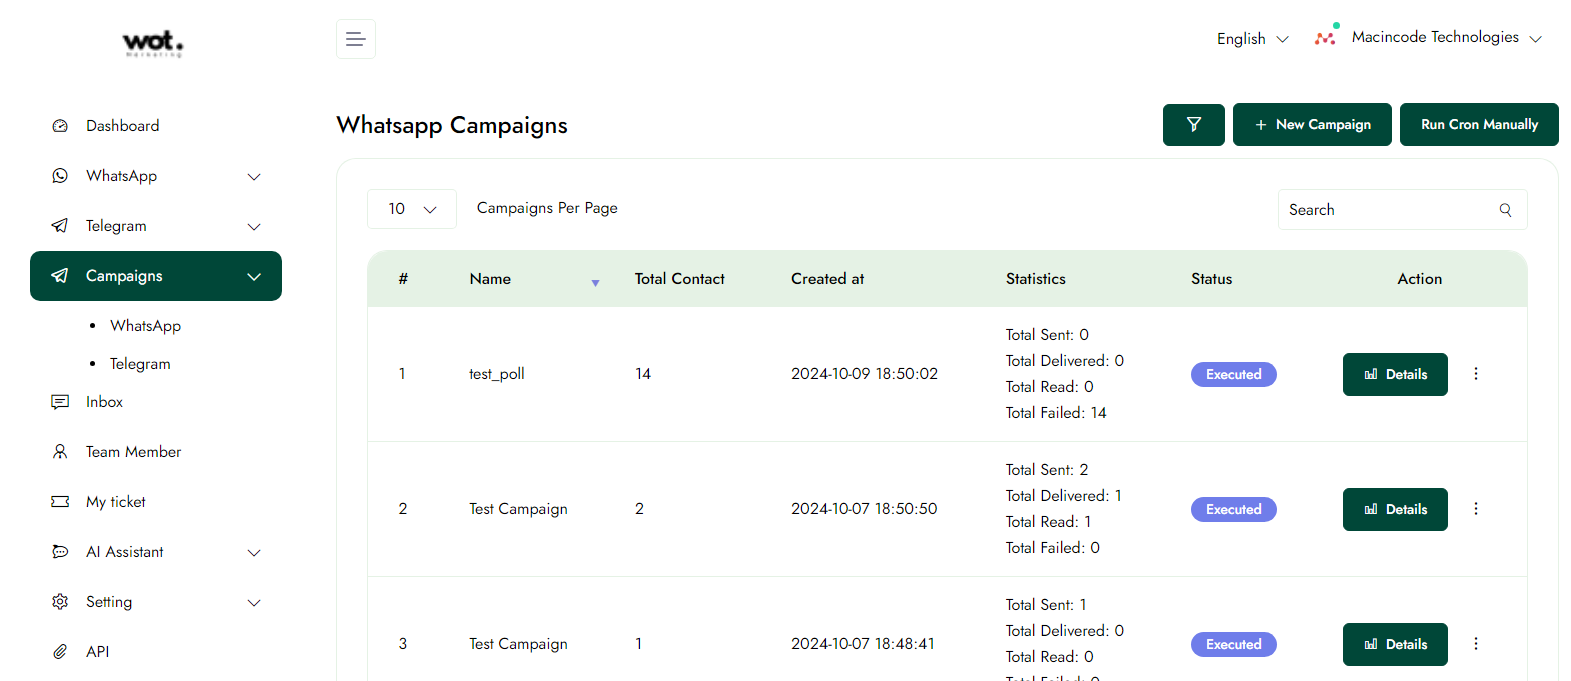
View the Campaigns details
Step-1:
Once logged in, click on Campaigns in the left panel.
Step-2:
Click the "Details" button on the campaigns page to view the details of a specific campaign.
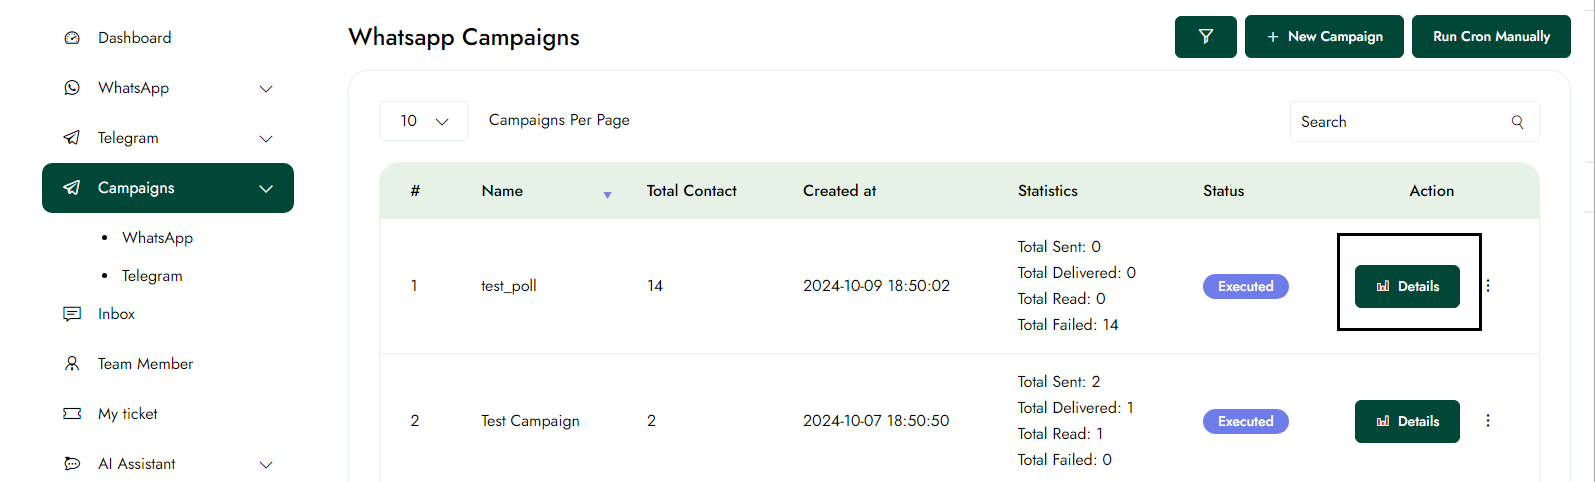
Step-3:
You can view the details of a specific campaign.

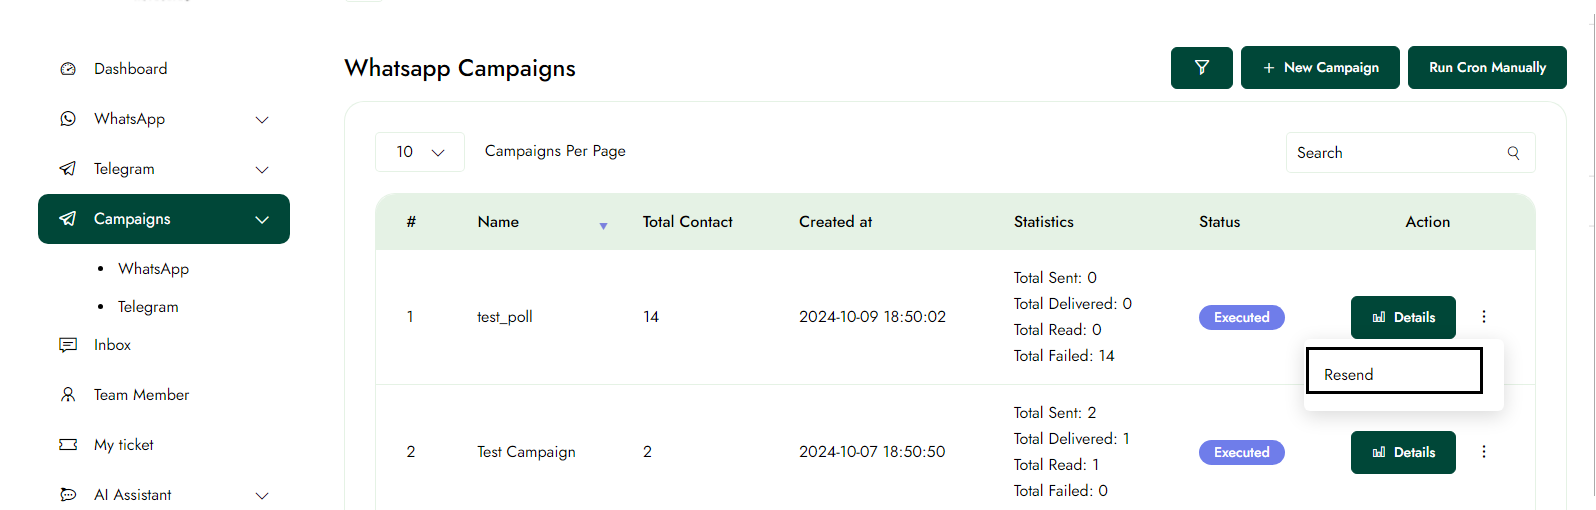
Resend the campaign.
Step-1:
Once logged in, click on Campaigns in the left panel.
Step-2:
Click the three dots in the top-right corner of the campaigns page, then select the "Resend" button to resend the campaign to the users.
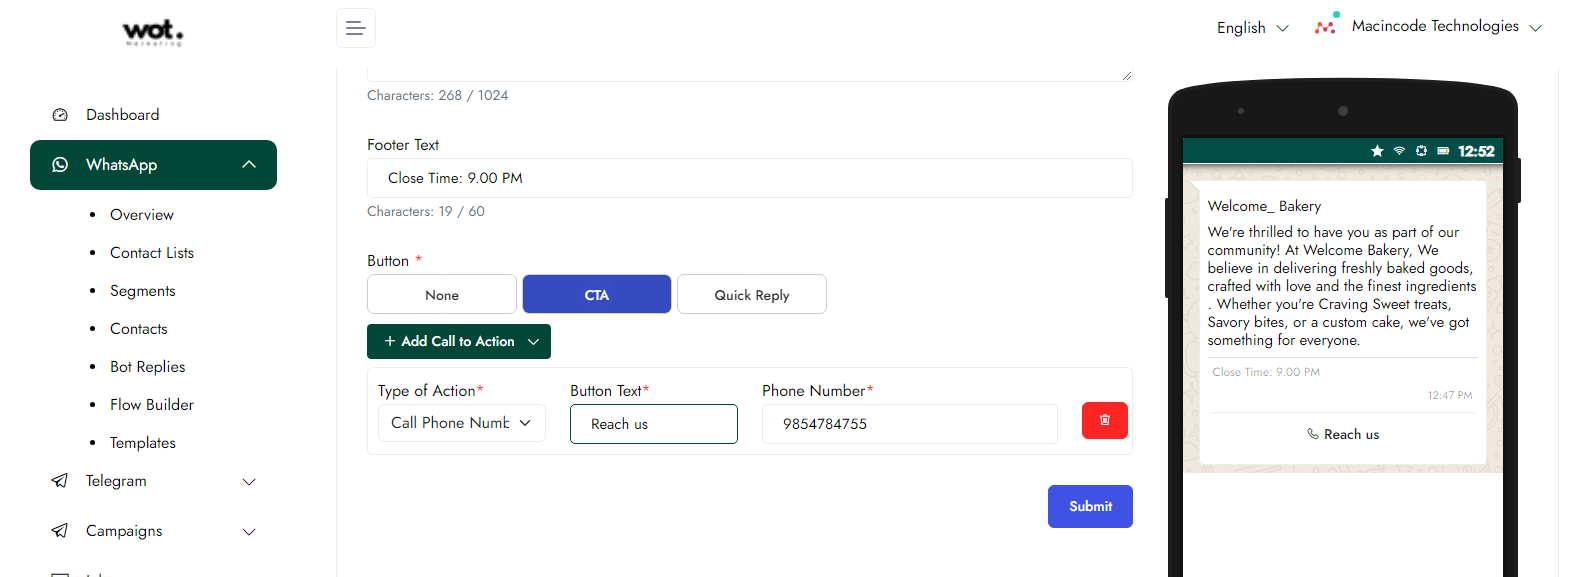
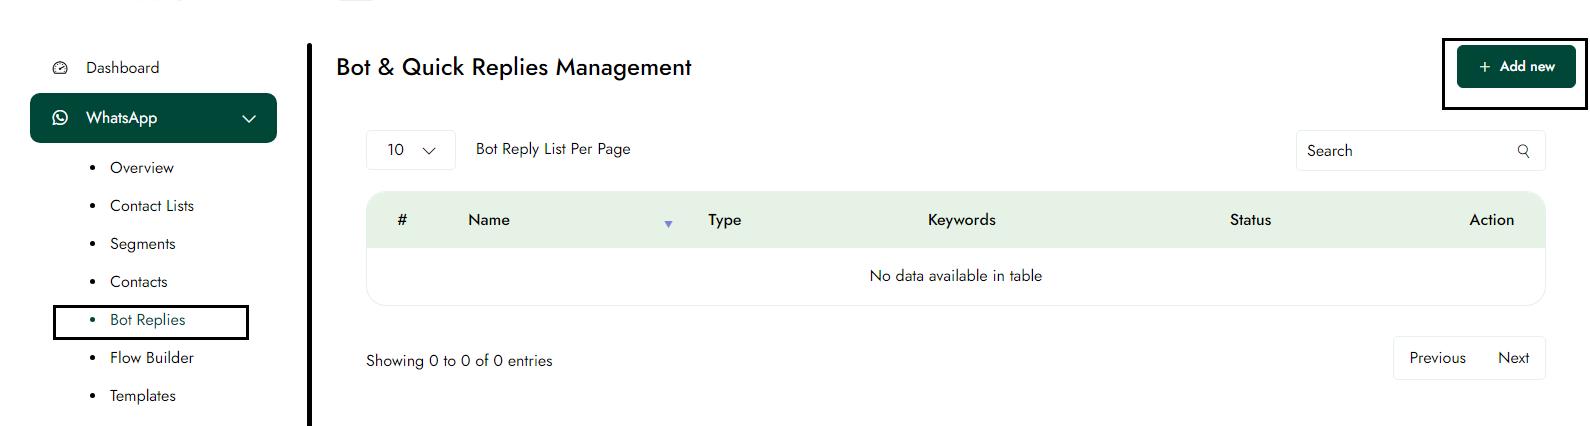
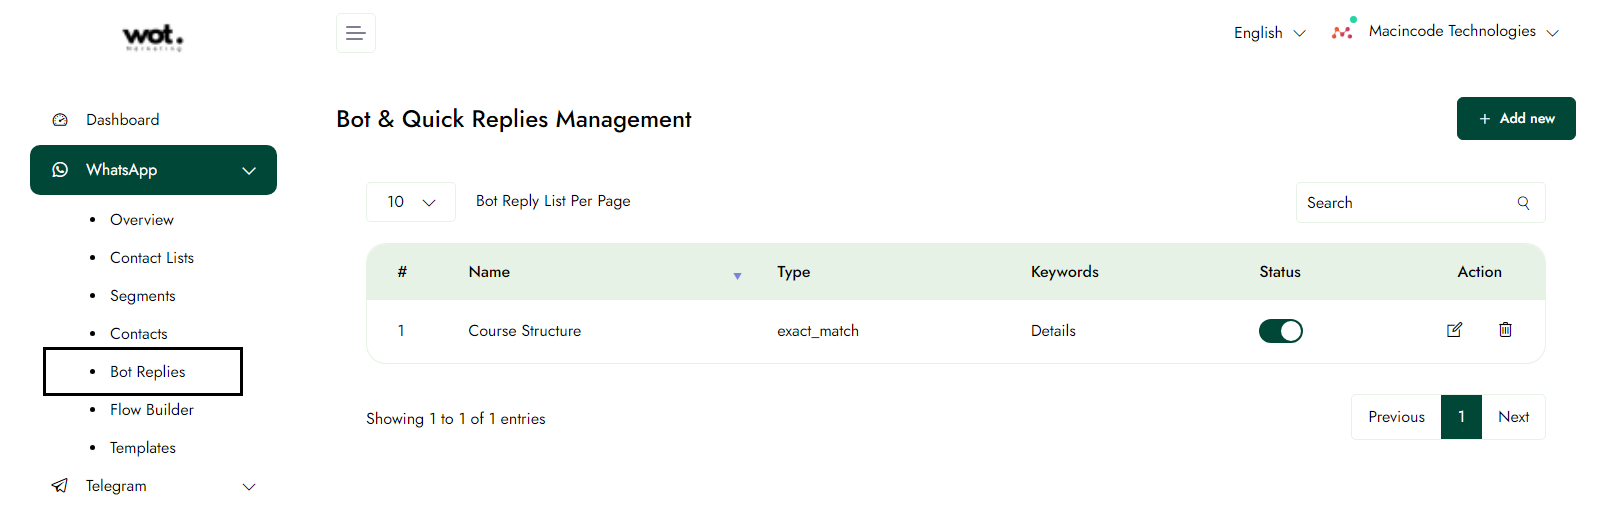
Bot replies
This article provides a guide to automating responses based on custom criteria within a WhatsApp marketing platform.
Step-1:
Once logged in, click on whatsapp in the left panel and then click bot replies.
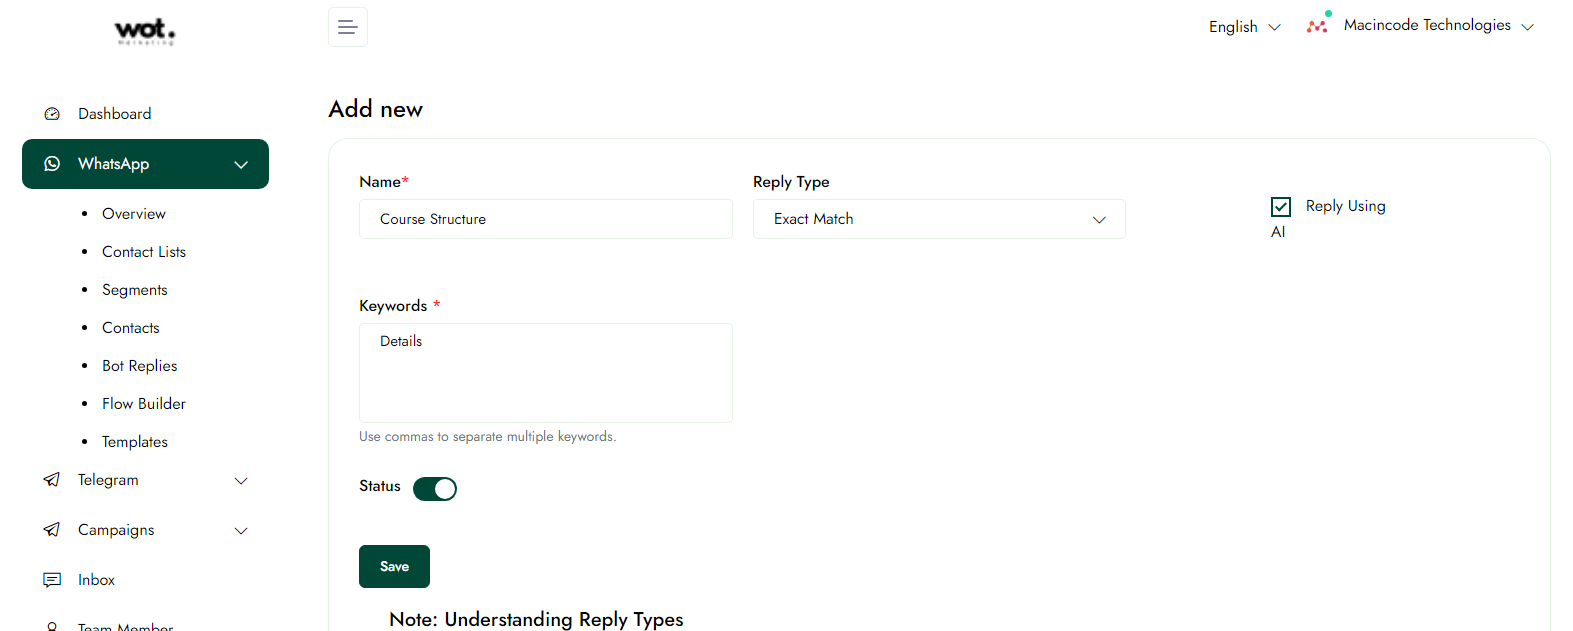
Step-2:
Create a new bot reply by entering the information, then click the save button to save the details.
Edit the Bot replies
Step-1:
Once logged in, click on bot replies in the left panel.
Step-2:
Click the edit icon to modify specific bot replies.
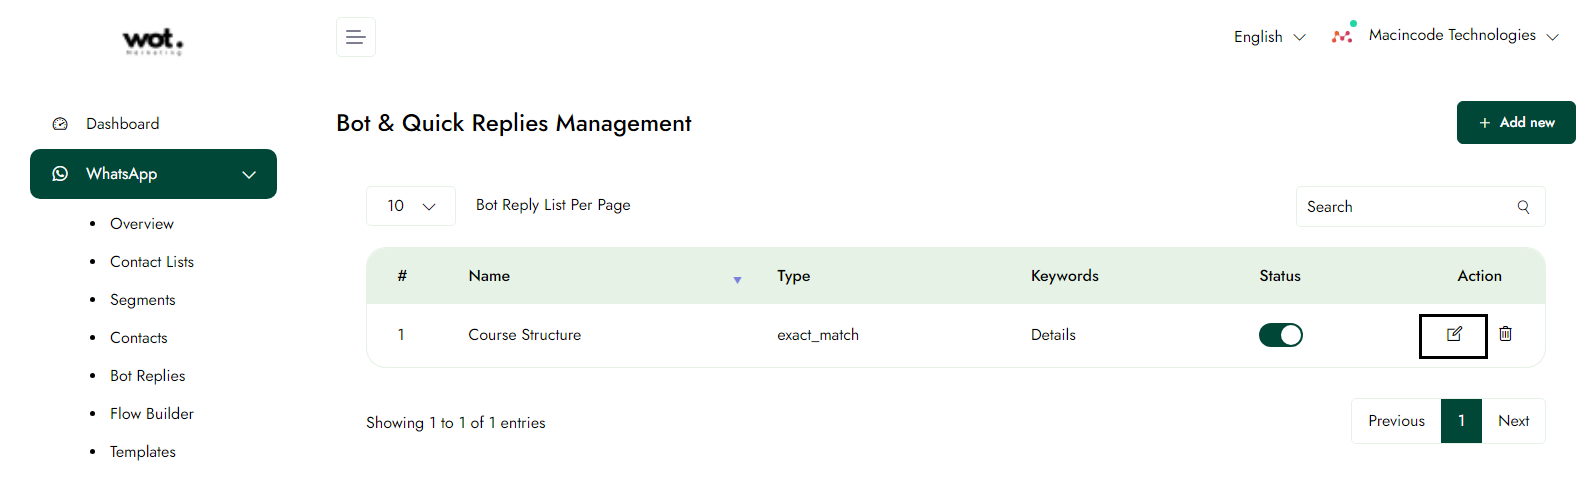
Step-3:
Edit the message and click the Save button to store the updated message in the list.

Delete the Bot replies
Step-1:
Once logged in, click on whatsapp in the left panel and then click bot replies.
Step-1:
Click the delete icon to remove the specific message information.

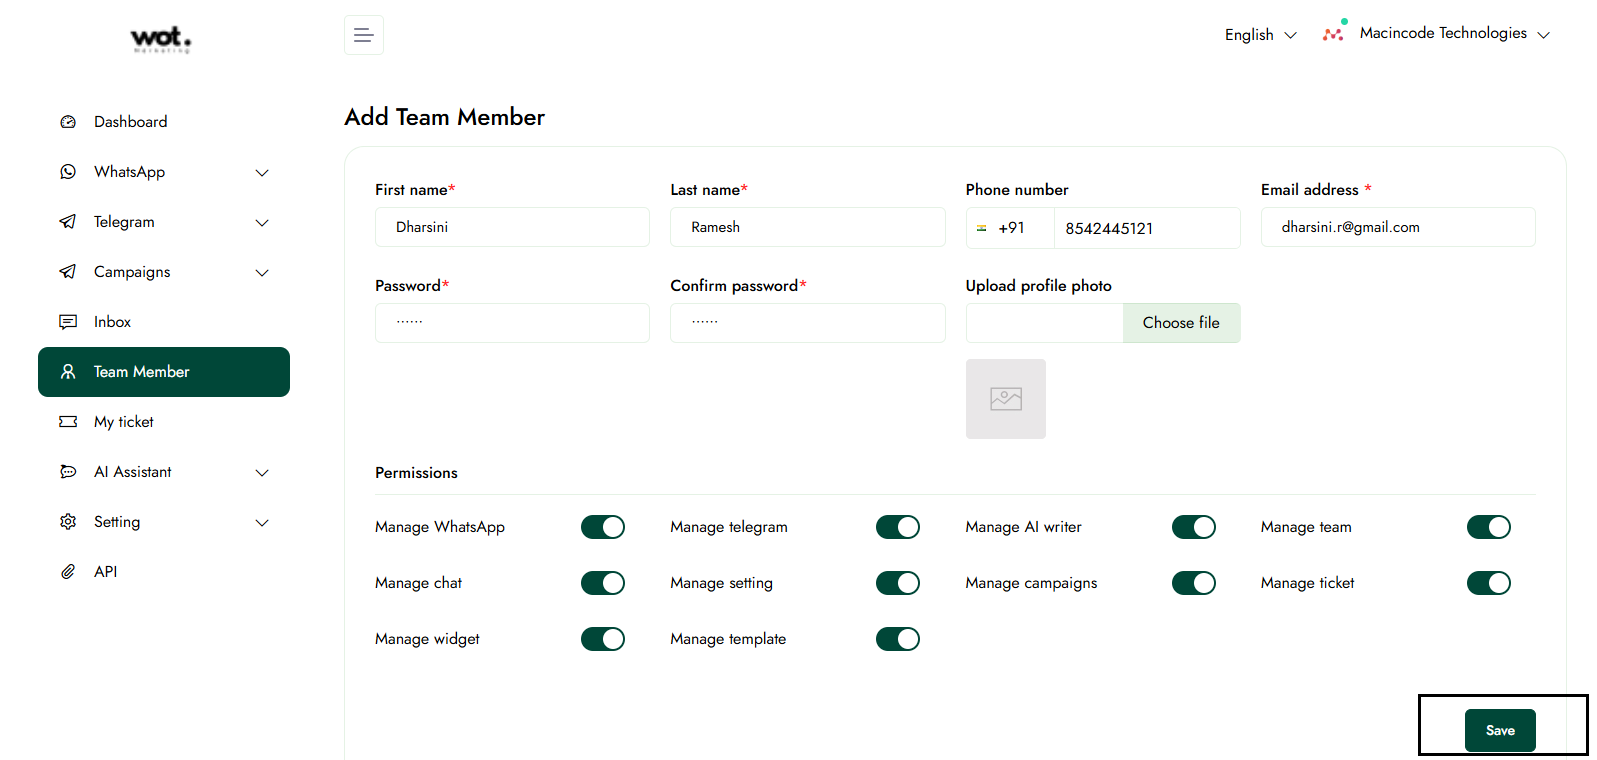
Team Member
Add accounts in your team
This article describes the process of managing team accounts—adding, editing, and deleting them—within a WhatsApp marketing platform.
Step-1:
Once logged in, click on Team Member in the left panel.
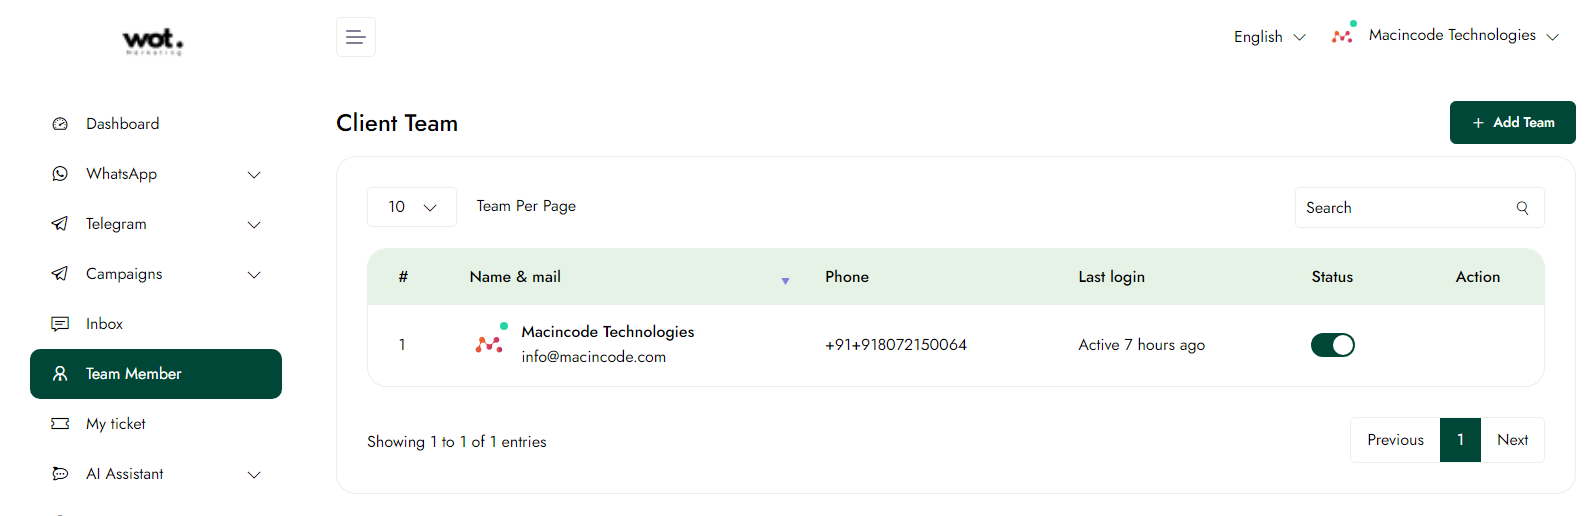
Step-2:
Click the "Add Team" button to complete all the information in the form.
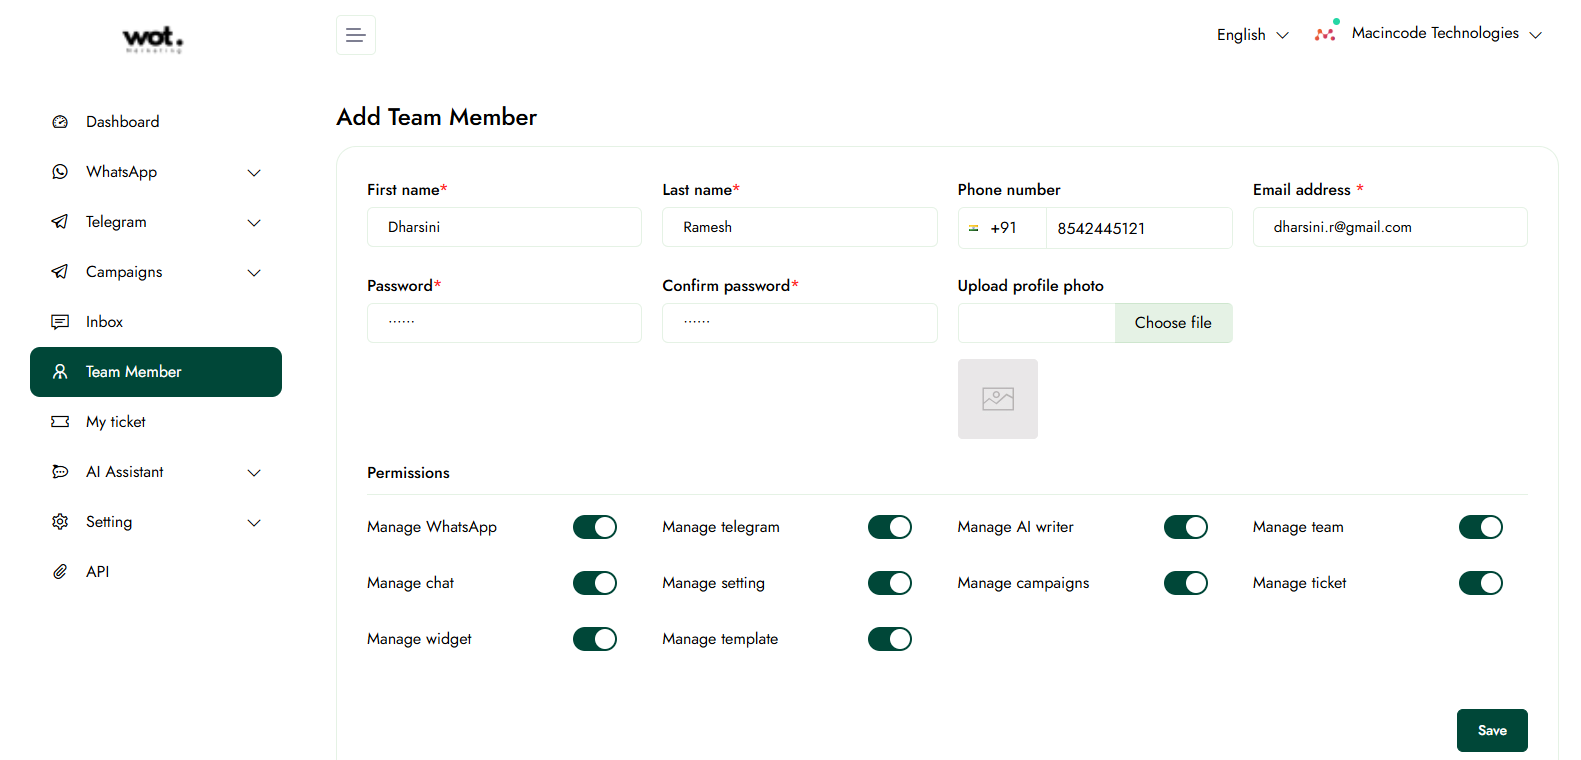
Step-3:
After completing step 2, click the "Save" button to add the user to the list.
Conclusion
WhatsApp marketing offers a powerful and direct way to connect with customers in today's mobile-first world. WOT247 provides the tools and strategies to help businesses leverage this platform effectively. By using WhatsApp for marketing, you can:
As WhatsApp continues to grow globally, integrating it into your marketing strategy is becoming increasingly important. WOT247 aims to be your partner in navigating this landscape, offering insights and solutions to make your WhatsApp marketing campaigns successful.